Love this? Save it for later!
Share the inspiration with your friends
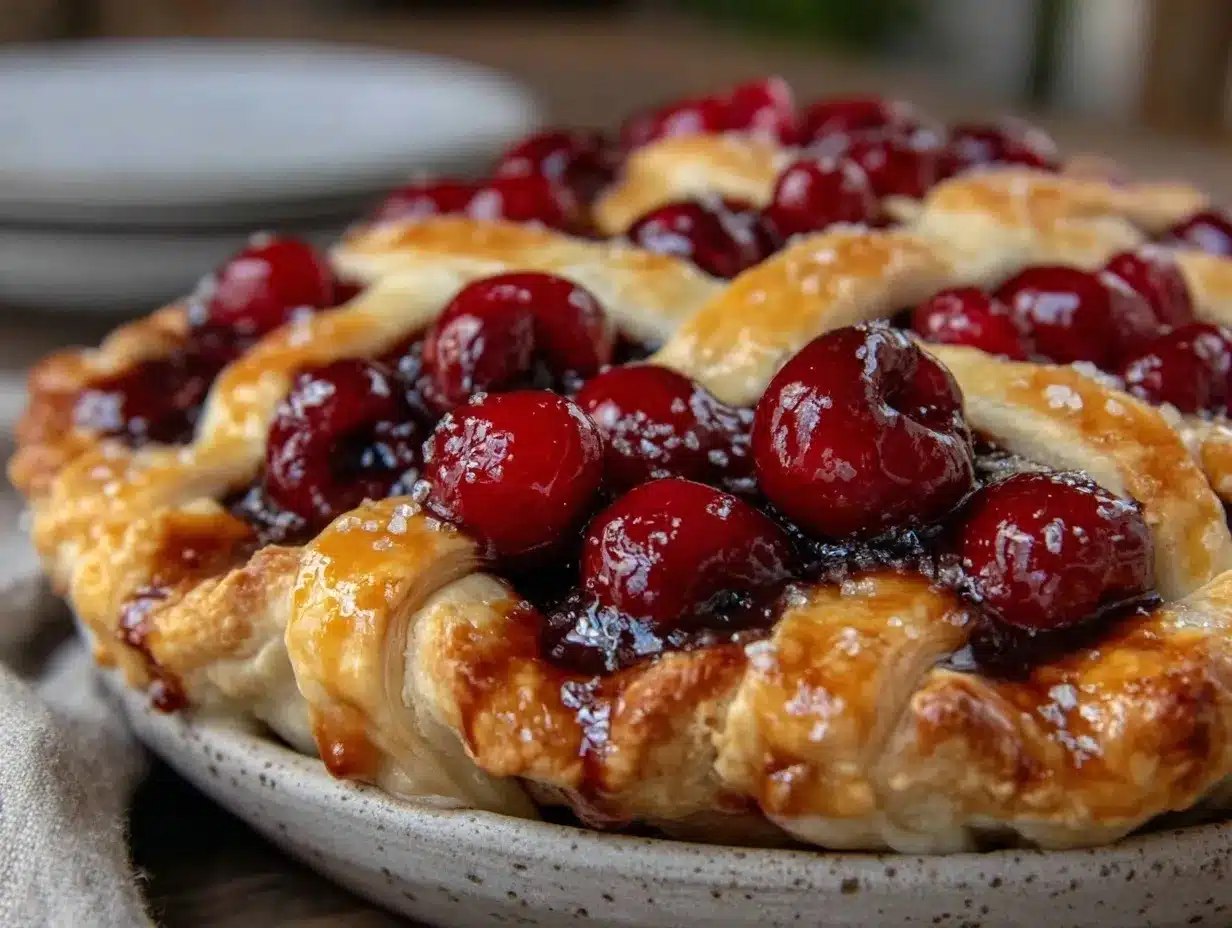
“You know that moment when a pie smells so good it practically pulls you through the door?” That’s exactly what happened last summer at my friend Lena’s cozy little garden party. She wasn’t fussing over fancy decorations or complicated dishes — just a simple sour cherry pie cooling on the windowsill. The golden lattice crust was perfectly flaky, and the filling bubbled with that sharp-sweet tang that makes your taste buds do a little happy dance. Honestly, I wasn’t expecting much when she handed me a slice, but that pie changed my whole perspective on cherry desserts.
What makes this sour cherry pie stand out isn’t just the balance of tart and sweet — it’s the flaky lattice crust that’s light as a whisper, yet sturdy enough to hold in all that juicy goodness. Lena confessed she’d stumbled upon this recipe while rummaging through an old church bake sale cookbook, hand-scribbled in the margins by someone named Elsie. The crust had been a bit of a happy accident — a last-minute fix when her usual method failed, but it turned out better than ever. Maybe you’ve been there — that moment when you’re racing against the clock and something just clicks.
So, I took notes, begged for the recipe, and tweaked it in my own kitchen. Let me tell you, this perfect sour cherry pie with flaky lattice crust has become my go-to summer treat — the kind you bring to potlucks or enjoy with a scoop of vanilla ice cream on a lazy afternoon. If you love a pie that’s equal parts nostalgic and fresh, with a crust that practically melts in your mouth, you’re going to want to stick around. Because this one’s got soul.
Why You’ll Love This Recipe
After trying countless cherry pies (and trust me, I’ve been on a mission), this recipe hits the sweet spot for so many reasons. It’s not just about the taste — it’s how it comes together, how it feels to make it, and the joy it brings to the table.
- Quick & Easy: You can have this pie ready to bake in under 45 minutes, perfect for those spontaneous baking urges or last-minute dessert needs.
- Simple Ingredients: No need to hunt down obscure items — everything’s probably sitting in your pantry or fridge right now.
- Perfect for Summer Gatherings: Whether it’s a backyard BBQ or a casual brunch, this pie shines as a crowd-pleaser.
- Crowd-Pleaser: Kids love the sweet-tart filling, and adults appreciate the buttery, flaky lattice crust that’s anything but ordinary.
- Unbelievably Delicious: The perfectly balanced sour cherry filling blends with that flaky crust for a texture and flavor combo that’s downright irresistible.
What really sets this recipe apart is the flaky lattice crust technique — I learned to handle the dough just enough to keep it tender but strong, and the lattice design lets the filling peek through, inviting everyone in. Plus, the filling uses fresh sour cherries with a touch of almond extract, which gives it a subtle, unexpected depth. This isn’t just another cherry pie recipe; it’s the one I reach for when I want that perfect mix of tradition and a little wow factor.
Honestly, there’s something about this pie that makes you pause after the first bite. It’s that comforting, soul-hugging kind of dessert that sticks with you — I hope you feel the same when you try it.
What Ingredients You Will Need
This recipe uses straightforward, wholesome ingredients to deliver bold flavor and satisfying texture without the fuss. Most of these are pantry staples, and if you grab fresh sour cherries when they’re in season, you’re in for a real treat.
- For the Pie Crust:
- 2 ½ cups (310g) all-purpose flour (I prefer King Arthur for consistent results)
- 1 teaspoon granulated sugar
- 1 teaspoon salt
- 1 cup (227g) unsalted butter, cold and cubed (use European-style butter if you want extra richness)
- 6-8 tablespoons ice water (add gradually for perfect dough texture)
- For the Sour Cherry Filling:
- 5 cups (about 700g) fresh pitted sour cherries (tart Morello cherries work beautifully here)
- 1 cup (200g) granulated sugar (adjust based on your cherries’ tartness)
- 3 tablespoons cornstarch (for thickening)
- 1 tablespoon fresh lemon juice (brightens the flavor)
- ½ teaspoon almond extract (optional, but trust me, it’s magic)
- 1 tablespoon unsalted butter, cut into small pieces (for dotting over the filling)
- 1 egg (for egg wash)
- 1 tablespoon coarse sugar (for sprinkling on top)
If you can’t find fresh sour cherries, frozen ones work just fine — just thaw and drain them well before using. For a gluten-free version, swap the flour for a high-quality gluten-free blend, but keep the butter cold for that flaky crust. And if almond extract isn’t your thing, a splash of vanilla extract will do just fine.
Equipment Needed
- Mixing Bowls: You’ll need a couple — one for your dough and one for the filling.
- Pastry Cutter or Food Processor: To cut the butter into the flour. I’ve done it by hand many times, but a food processor speeds things up.
- Rolling Pin: Essential for rolling out your dough evenly.
- 9-inch (23cm) Pie Dish: A glass or ceramic pie plate works best for even baking.
- Pastry Brush: For brushing on the egg wash to get that gorgeous golden crust.
- Sharp Knife or Pizza Cutter: To create the lattice strips.
- Cooling Rack: To let your pie cool properly after baking.
If you don’t have a pastry cutter, two forks or even your fingers work in a pinch — just be sure to keep the butter cold. For rolling, a silicone baking mat can make cleanup easier, though a lightly floured countertop does the trick. I’ve found that a pie shield or strips of foil help prevent the edges from burning if your oven tends to run hot.
Preparation Method
- Prepare the Pie Dough: In a large bowl, whisk together 2 ½ cups flour, sugar, and salt. Add the cold, cubed butter. Use a pastry cutter or food processor pulses to cut the butter into the flour until the mixture resembles coarse crumbs with some pea-sized pieces. Slowly add ice water, one tablespoon at a time, mixing gently until the dough just starts to hold together. (Be careful not to overwork the dough — you want it shaggy, not smooth.) Wrap the dough in plastic wrap and chill for at least 1 hour.
- Make the Cherry Filling: In a medium bowl, combine the pitted sour cherries, sugar, cornstarch, lemon juice, and almond extract. Toss gently to coat. Set aside while you roll out the dough; this resting time helps the flavors meld.
- Roll Out the Dough: Divide the chilled dough into two portions — about 2/3 for the bottom crust and 1/3 for the lattice top. On a lightly floured surface, roll out the larger portion into a 12-inch (30cm) circle, about 1/8 inch thick. Carefully transfer it to your pie dish, pressing gently into the edges. Trim any excess dough hanging over the sides.
- Fill the Pie: Pour the cherry filling into the crust, spreading evenly. Dot with small pieces of the 1 tablespoon butter. This adds a lovely richness as it melts during baking.
- Create the Lattice Top: Roll out the smaller dough portion into a 10-inch (25cm) circle. Cut into ½-inch wide strips using a sharp knife or pizza cutter. Lay half the strips parallel across the pie. Fold back every other strip, lay a strip perpendicular, then unfold the folded strips over it. Repeat with the remaining strips, weaving a lattice pattern. Trim excess dough and press the edges to seal.
- Finish and Bake: Whisk the egg and brush it over the lattice crust. Sprinkle with coarse sugar for sparkle and crunch. Place the pie on a baking sheet to catch drips and bake in a preheated 375°F (190°C) oven for 45-50 minutes, or until the crust is golden and the filling is bubbling. If the crust edges brown too fast, cover them with foil halfway through.
- Cool Before Serving: Let the pie cool on a rack for at least 2 hours. This helps the filling set so it doesn’t run when sliced.
Pro tip: If your dough feels sticky while rolling, pop it back in the fridge for 10 minutes to chill. Also, don’t rush the lattice weaving — the pattern not only looks stunning but helps the pie bake evenly. I once tried freeform topping, and the filling got a bit too wild!
Cooking Tips & Techniques
Getting that flaky crust and perfect filling texture can feel tricky, but a few tricks make all the difference.
- Keep Everything Cold: Butter and water should be ice cold to prevent the fat from melting before baking. This creates those flaky layers we all crave.
- Don’t Overwork the Dough: Over-kneading develops gluten, which makes crust tough. Mix just until it comes together.
- Use a Pastry Blender or Food Processor: These tools help evenly distribute cold butter without melting it from your hands.
- Lattice Weaving: Practice makes perfect. If your strips break, just patch with a little extra dough and press gently.
- Watch the Oven Temperature: Every oven is a bit different. If your crust browns too quickly, lower the heat slightly or cover edges with foil.
- Let the Pie Cool: I know it’s tempting, but slicing too early leads to a runny filling. Give it time to set for clean slices.
My own kitchen disasters usually come from rushing the chilling step. Once, I skipped it (shame on me), and the crust ended up chewy instead of flaky. Lesson learned: patience is key!
Variations & Adaptations
This sour cherry pie recipe is a great base to play with, depending on your taste or dietary needs.
- Dietary Variation: For a vegan pie, swap butter with chilled coconut oil or a vegan butter substitute. Use a flax egg for the wash instead of a real egg.
- Seasonal Twist: In the fall, try swapping sour cherries for tart apples with a sprinkle of cinnamon and nutmeg.
- Flavor Boost: Add a teaspoon of fresh ginger or a splash of kirsch cherry brandy to the filling for a little extra zing.
- Gluten-Free Option: Use a high-quality gluten-free flour blend. You might need to add a tablespoon or two more cold water to get the dough just right.
- Personal Favorite: I’ve experimented by adding a handful of chopped toasted almonds on top before baking for a bit of crunch.
Changing the lattice to a solid top crust with decorative vent slits gives a more rustic look if you prefer. And if you want a less tart pie, swap half the sour cherries with sweet cherries.
Serving & Storage Suggestions
This perfect sour cherry pie is best served at room temperature or slightly warm. I love it with a scoop of vanilla bean ice cream or a dollop of freshly whipped cream — the cold creaminess plays beautifully against the tart filling.
Leftovers? No problem. Wrap the pie tightly with plastic wrap and store it in the fridge for up to 4 days. When ready to enjoy again, warm slices gently in a 300°F (150°C) oven for 10-15 minutes to bring back that fresh-baked feel.
If you want to freeze the pie, bake it completely first. Once cooled, wrap well with foil and freeze for up to 2 months. Thaw in the fridge overnight before reheating.
One thing I’ve noticed: the flavors deepen overnight, so if you can wait, the second-day pie tastes even better. The filling softens just enough to be perfectly spoonable without losing that satisfying texture.
Nutritional Information & Benefits
This sour cherry pie serves about 8 slices, with each slice providing approximately 320 calories. It offers a moderate amount of fat from the butter and a good hit of dietary fiber and antioxidants from the cherries.
Sour cherries are known for their anti-inflammatory properties and are a good source of vitamin C and potassium. Of course, this is a treat, but I appreciate that it uses real fruit and simple ingredients — making it a dessert that feels a little less guilty.
For those watching carbs, you could reduce sugar or experiment with natural sweeteners, though the sugar helps balance the cherries’ tartness and thickens the filling nicely.
Allergens to note: this recipe contains gluten, dairy, and eggs. The variations section offers a few substitutions if you need to avoid any of these.
Conclusion
This perfect sour cherry pie with flaky lattice crust is one of those recipes that makes you feel like a kitchen hero — even if you’re just an average home cook like me. It’s approachable, satisfying, and honestly, kind of magical when you get that crust just right and the filling is bubbling through the lattice.
Feel free to make it yours — tweak the sweetness, change up the lattice, or add your favorite spice. That’s the joy of baking: it’s part tradition, part experiment, and all heart.
If you give it a try, I’d love to hear how it turns out or what twists you added. Share your thoughts or adaptations in the comments — let’s keep this pie love going!
Remember, baking is as much about the journey as the delicious destination. Happy pie making!
FAQs
Can I use frozen sour cherries for this pie?
Yes! Just thaw them completely and drain any excess liquid before mixing with the other filling ingredients to avoid a watery pie.
How do I prevent the crust edges from burning?
Cover the edges with foil or a pie crust shield halfway through baking. This protects them while the rest of the pie finishes baking.
What if my lattice strips break while weaving?
Don’t worry! Patch them with small bits of dough and gently press to seal. It won’t affect the taste, just the look.
Can I make the pie crust ahead of time?
Absolutely. You can prepare the dough and freeze it wrapped tightly for up to 2 days. Thaw in the fridge overnight before rolling out.
How do I get a really flaky crust?
Keep your butter and water ice cold, handle the dough as little as possible, and chill it before rolling out. These steps help create those beautiful flaky layers.
Pin This Recipe!

Perfect Sour Cherry Pie Recipe Easy Flaky Lattice Crust Guide

A nostalgic and fresh sour cherry pie featuring a perfectly flaky lattice crust and a sharp-sweet tart cherry filling, ideal for summer gatherings and potlucks.
- Prep Time: 15 minutes
- Cook Time: 45-50 minutes
- Total Time: 1 hour 15 minutes
- Yield: 8 servings 1x
- Category: Dessert
- Cuisine: American
Ingredients
- 2 ½ cups (310g) all-purpose flour
- 1 teaspoon granulated sugar
- 1 teaspoon salt
- 1 cup (227g) unsalted butter, cold and cubed
- 6–8 tablespoons ice water
- 5 cups (about 700g) fresh pitted sour cherries
- 1 cup (200g) granulated sugar
- 3 tablespoons cornstarch
- 1 tablespoon fresh lemon juice
- ½ teaspoon almond extract (optional)
- 1 tablespoon unsalted butter, cut into small pieces
- 1 egg (for egg wash)
- 1 tablespoon coarse sugar (for sprinkling on top)
Instructions
- Prepare the Pie Dough: In a large bowl, whisk together 2 ½ cups flour, sugar, and salt. Add the cold, cubed butter. Use a pastry cutter or food processor pulses to cut the butter into the flour until the mixture resembles coarse crumbs with some pea-sized pieces. Slowly add ice water, one tablespoon at a time, mixing gently until the dough just starts to hold together. Wrap the dough in plastic wrap and chill for at least 1 hour.
- Make the Cherry Filling: In a medium bowl, combine the pitted sour cherries, sugar, cornstarch, lemon juice, and almond extract. Toss gently to coat. Set aside while you roll out the dough.
- Roll Out the Dough: Divide the chilled dough into two portions — about 2/3 for the bottom crust and 1/3 for the lattice top. On a lightly floured surface, roll out the larger portion into a 12-inch circle, about 1/8 inch thick. Carefully transfer it to your pie dish, pressing gently into the edges. Trim any excess dough hanging over the sides.
- Fill the Pie: Pour the cherry filling into the crust, spreading evenly. Dot with small pieces of the 1 tablespoon butter.
- Create the Lattice Top: Roll out the smaller dough portion into a 10-inch circle. Cut into ½-inch wide strips using a sharp knife or pizza cutter. Lay half the strips parallel across the pie. Fold back every other strip, lay a strip perpendicular, then unfold the folded strips over it. Repeat with the remaining strips, weaving a lattice pattern. Trim excess dough and press the edges to seal.
- Finish and Bake: Whisk the egg and brush it over the lattice crust. Sprinkle with coarse sugar. Place the pie on a baking sheet and bake in a preheated 375°F (190°C) oven for 45-50 minutes, or until the crust is golden and the filling is bubbling. Cover edges with foil halfway through if they brown too fast.
- Cool Before Serving: Let the pie cool on a rack for at least 2 hours to allow the filling to set.
Notes
Keep butter and water ice cold to ensure a flaky crust. Do not overwork the dough to avoid toughness. Use foil or a pie crust shield to prevent edges from burning. Let the pie cool completely before slicing to avoid runny filling. Frozen sour cherries can be used if thawed and drained well. For vegan or gluten-free variations, substitute butter and flour accordingly.
Nutrition
- Serving Size: 1 slice (1/8 of pie)
- Calories: 320
- Sugar: 25
- Sodium: 210
- Fat: 18
- Saturated Fat: 11
- Carbohydrates: 40
- Fiber: 2
- Protein: 3
Keywords: sour cherry pie, cherry pie, lattice crust, flaky pie crust, summer dessert, homemade pie, cherry dessert