Love this? Save it for later!
Share the inspiration with your friends
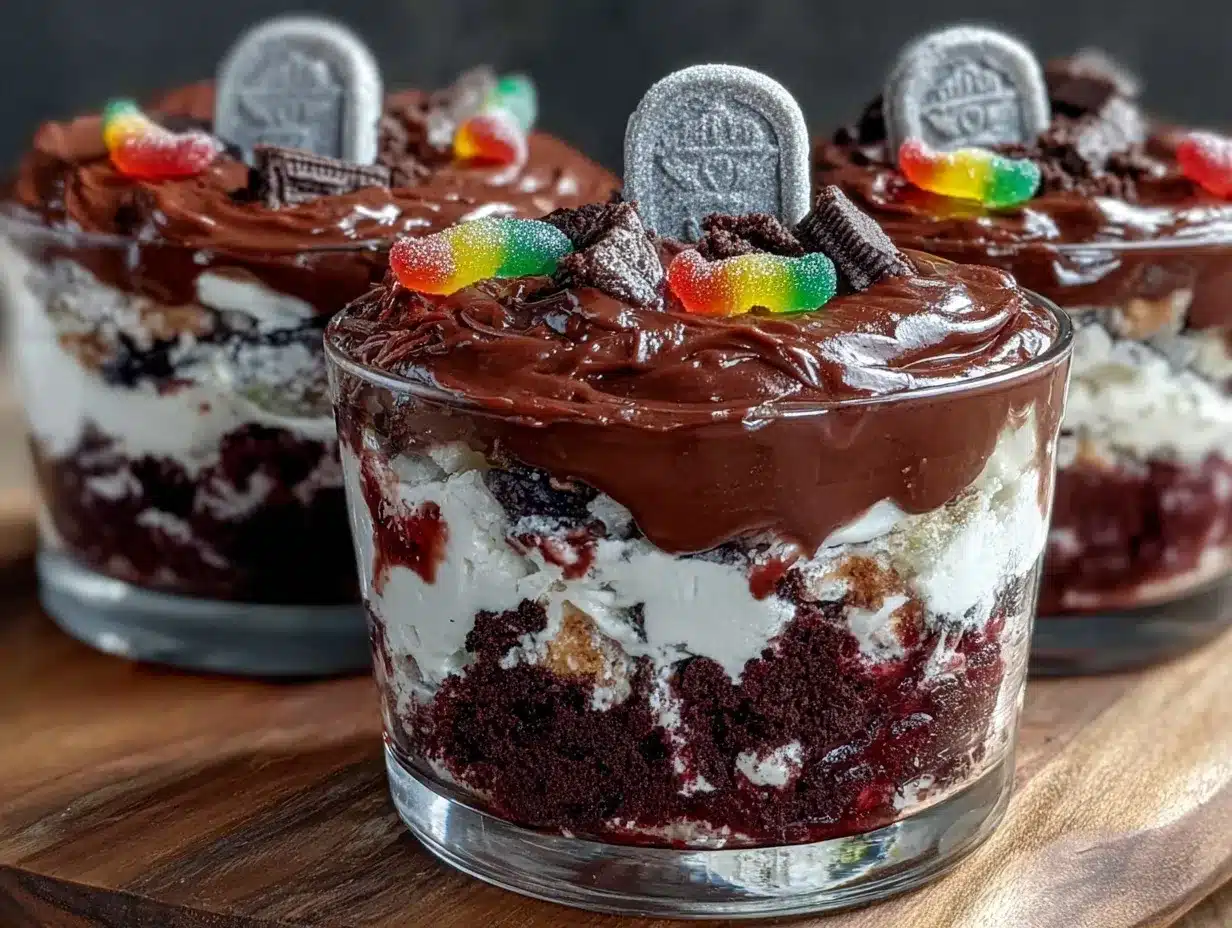
Last Halloween, I wasn’t even planning to make anything special. I had just popped over to my neighbor’s place to borrow some sugar for my morning coffee. But before I could even step inside, the unmistakable scent of chocolate and something sweet tangled in the air, pulling me right into the kitchen. There, casually perched on the counter, were these Delicious Spooky Graveyard Oreo Dirt Cups with Gummy Worms—like they were just everyday snacks, not a festive masterpiece. Honestly, the way my neighbor whipped them up without fuss or fanfare made me a little envious. She wasn’t trying to impress, just having fun with a simple, playful treat. The crushed Oreos looked like real dirt, and gummy worms peeked out from the cups like they had just wriggled out of the earth. I remember knocking over a bowl by accident while reaching for one, and she just laughed it off, reminding me that the mess is part of the fun.
That day, I realized sometimes the best recipes aren’t the ones that take hours or come with complicated instructions—they’re the ones that feel effortless, joyful, and a little bit mischievous. Maybe you’ve been there too, drawn in by the smell or the look of something that seems simple but has that “wow” factor. These Oreo dirt cups have stuck with me because they’re exactly that—easy to make, instantly fun, and perfect for Halloween or anytime you want to bring a little spooky delight to your table.
Why You’ll Love This Recipe
Let me tell you why these Delicious Spooky Graveyard Oreo Dirt Cups are a must-try, especially if you want to impress without breaking a sweat:
- Quick & Easy: Comes together in under 20 minutes, so you can whip them up even if you’re last-minute prepping for a Halloween party or just craving something fun.
- Simple Ingredients: No fancy shopping trips — most of this recipe uses pantry staples like Oreos, pudding mix, and gummy worms.
- Perfect for Halloween: The spooky graveyard theme is fun for kids and adults alike, making it a hit at parties or classroom treats.
- Crowd-Pleaser: The creamy pudding, crunchy Oreo “dirt,” and chewy gummy worms offer a playful combo that always gets smiles (and second helpings).
- Unbelievably Delicious: The texture contrast and chocolatey flavor combo make this dessert far from your average pudding cup.
This isn’t just another dirt cup recipe, either. What makes it stand out is the little touches — like using crushed Oreo pieces that aren’t too fine, so you get that perfect crumbly “soil” texture. Plus, placing candy tombstones or Halloween-themed decorations on top makes the presentation pop. Honestly, it’s the kind of recipe that gets you closing your eyes after the first bite, savoring the mix of creamy, crunchy, and chewy all at once. It’s comfort food with a cheeky Halloween twist, and it’s perfect for impressing guests without any stress.
What Ingredients You Will Need
This recipe uses simple, wholesome ingredients to deliver bold flavor and a satisfying texture without the fuss. Most of these you probably have on hand, or can easily grab from your local store.
- For the Dirt Cups Base:
- 1 package (3.9 oz/110g) instant chocolate pudding mix
- 2 cups (480ml) cold milk (whole or 2% work best for creaminess)
- 1 cup (240ml) heavy cream, whipped (optional, for extra fluffiness)
- For the Oreo “Dirt”:
- 25 Oreo cookies, crushed (I prefer original Oreos for the best chocolate flavor)
- Note: Don’t crush them too fine—you want some texture like real soil.
- For the Graveyard Decor:
- Gummy worms (about 20 worms, depending on cup count)
- Halloween-themed cookie tombstones or candy tombstones (optional but fun!)
- Black licorice pieces or mini chocolate chips (for extra “graveyard” details)
Substitution tips: You can swap regular milk with almond or oat milk for a dairy-free option, though the pudding texture will be slightly different. Also, if you want a lighter version, skip the heavy cream and just use pudding and milk. For gluten-free, try gluten-free chocolate sandwich cookies instead of Oreos.
Equipment Needed
- Mixing bowls – one medium for pudding, one small for crushing Oreos
- Electric mixer or whisk (to whip cream, if using)
- Measuring cups and spoons
- Plastic or glass cups for serving (clear cups really show off the layers)
- Spoon or spatula for layering ingredients
- Food storage container for leftovers
If you don’t have an electric mixer, no worries—a sturdy whisk works fine for whipping cream, though it takes a bit longer. I’ve also used disposable plastic cups for easy cleanup at parties, but glass cups add a nice touch when serving at home. Crushing Oreos in a zip-top bag with a rolling pin works just as well if you want to skip the food processor.
Preparation Method
- Prepare the chocolate pudding: In a medium bowl, whisk together the instant chocolate pudding mix and cold milk (2 cups or 480ml). Stir vigorously for about 2 minutes until thickened. Let it set for 5 minutes in the fridge to firm up.
- Whip the heavy cream: If you’re using heavy cream, whip 1 cup (240ml) until soft peaks form (about 3-5 minutes with an electric mixer). Gently fold the whipped cream into the pudding for a lighter, fluffier texture. If skipping this step, just use the pudding as is.
- Crush the Oreos: Place 25 Oreo cookies into a large zip-top bag. Use a rolling pin or heavy pan to crush the cookies until you have mostly small crumbs with a few larger chunks to mimic “dirt.” Avoid pulverizing them completely fine.
- Assemble the dirt cups: Spoon a layer of crushed Oreos into the bottom of each serving cup (about 2 tablespoons). Add a generous layer of pudding on top (about ¼ cup or 60ml). Repeat layers once more if your cup is tall enough, ending with a top layer of crushed Oreos to look like soil.
- Add gummy worms and decorations: Push a few gummy worms partially into the top “dirt” layer so they’re peeking out. Place cookie or candy tombstones upright to create a mini graveyard effect. Add small licorice pieces or chocolate chips for extra spooky details.
- Chill before serving: Refrigerate the assembled cups for at least 30 minutes to allow flavors to meld and pudding to chill. This also helps the “dirt” set a bit so it doesn’t crumble too much when eating.
- Serve and enjoy: These are best served cold straight from the fridge. Grab a spoon, dig in, and watch the gummy worms wiggle as you eat!
Cooking Tips & Techniques
Making these Oreo dirt cups is pretty straightforward, but a few tricks can make your spooky treat shine:
- Don’t rush the pudding setting time. Letting the pudding firm up in the fridge before assembling helps keep layers distinct and prevents a soggy mess.
- Crushing Oreos: Aim for varied Oreo pieces—too fine and the dirt looks dusty; too chunky and it’s hard to eat. I like to leave some bigger chunks for texture.
- Whipping cream: If you’re folding whipped cream into the pudding, make sure it’s just stiff enough to hold shape but not dry. Over-whipped cream can make the pudding grainy.
- Layering: Use a small spoon or piping bag to layer pudding cleanly. It looks nicer and makes the “graveyard” effect pop.
- Timing: These cups hold well for up to 24 hours refrigerated. Make them a few hours ahead to save stress on party day.
One time, I forgot to chill the pudding first and ended up with a messy mix, but after that, I never skipped the fridge step. Also, when I first added gummy worms, I poked a few too deep and they disappeared in the dirt, so I learned to just let them peek out for the full creepy effect.
Variations & Adaptations
This recipe is super flexible, so you can tweak it to suit different needs or occasions:
- Dairy-Free Version: Use dairy-free chocolate pudding mix and coconut or almond milk, plus dairy-free whipped topping. Substitute Oreos with a gluten-free or vegan cookie alternative.
- Fruitier Twist: Add a layer of fresh raspberries or sliced strawberries between pudding and Oreo layers for a tart contrast that brightens the rich chocolate.
- Spiced Dirt Cups: Mix a pinch of cinnamon or pumpkin pie spice into the pudding for a cozy fall flavor that pairs well with the Halloween theme.
- Different Worms: Swap gummy worms for sour candy snakes or use candy eyeballs to up the spook factor.
Personally, I once tried mixing crushed peppermint Oreos into the dirt for a minty surprise—kids were weirdly into it! You can also assemble these in a big trifle bowl for a party centerpiece rather than individual cups.
Serving & Storage Suggestions
Serve your spooky graveyard Oreo dirt cups chilled for the best texture and flavor. Clear plastic or glass cups show off the layers beautifully, so presentation is key if you want that “wow” factor. These cups pair wonderfully with warm apple cider or a chilled sparkling punch for a festive Halloween spread.
Store leftovers tightly covered in the refrigerator for up to 24 hours. After a day, the crushed Oreos might start to soften, so it’s best to enjoy them fresh. To re-chill, give them a quick 10-minute stint in the fridge before serving again.
The flavors actually deepen if you let the cups rest a few hours, making the chocolate pudding creamier and the “dirt” meld nicely with the pudding. However, gummy worms might lose a bit of their chewiness over time, so plan accordingly.
Nutritional Information & Benefits
Each serving of these dirt cups (about 1 cup or 240ml) has roughly:
| Calories | 280-320 kcal |
|---|---|
| Fat | 12-15g |
| Carbohydrates | 40-45g |
| Protein | 4-6g |
The key ingredients like milk provide calcium and vitamin D, while Oreos add sugar and fat—so these are definitely a treat best enjoyed in moderation. For those watching gluten, note Oreos contain wheat, but gluten-free cookie substitutes work well. The recipe is low in fiber but packed with fun and flavor.
From a wellness perspective, I think it’s important to enjoy treats like these guilt-free—sometimes, you just need a little spooky indulgence to brighten your day!
Conclusion
To wrap it up, these Delicious Spooky Graveyard Oreo Dirt Cups with Gummy Worms are the perfect mix of easy, fun, and festive. Whether you’re throwing a Halloween bash or just want to surprise the family with a playful dessert, this recipe fits the bill without drama or fancy ingredients.
Feel free to customize the decorations, swap ingredients to suit your needs, or even turn it into a group activity where everyone assembles their own dirt cup. Honestly, that’s part of the charm—it’s as much about the making as the eating.
If you try this recipe, I’d love to hear how your spooky graveyard turned out! Leave a comment below or share your own twists and tricks. Happy haunting in the kitchen!
FAQs
Can I make these dirt cups ahead of time?
Yes! Make them up to 24 hours in advance and store covered in the fridge. Just add gummy worms and decorations right before serving for best freshness.
What if I don’t have Oreo cookies?
You can use any chocolate sandwich cookies or even crushed chocolate graham crackers for a different texture and flavor.
How do I keep the gummy worms from sticking together?
Toss them lightly in a bit of cornstarch before placing them on the dirt cups; this prevents clumping and keeps them looking fresh.
Can kids make this recipe by themselves?
Absolutely! It’s a fun and safe recipe for kids to layer ingredients and decorate, with adult supervision for mixing pudding and crushing cookies.
Are there any gluten-free options?
Yes, swap Oreos for gluten-free chocolate sandwich cookies and make sure your pudding mix is gluten-free. Many brands offer gluten-free instant pudding.
Pin This Recipe!

Delicious Spooky Graveyard Oreo Dirt Cups

Easy and fun Halloween-themed dessert featuring layers of chocolate pudding, crushed Oreos, and gummy worms that look like dirt and worms in a spooky graveyard.
- Prep Time: 10 minutes
- Cook Time: 0 minutes
- Total Time: 40 minutes
- Yield: 10 servings 1x
- Category: Dessert
- Cuisine: American
Ingredients
- 1 package (3.9 oz/110g) instant chocolate pudding mix
- 2 cups (480ml) cold milk (whole or 2% recommended)
- 1 cup (240ml) heavy cream, whipped (optional)
- 25 Oreo cookies, crushed (original Oreos preferred)
- About 20 gummy worms
- Halloween-themed cookie or candy tombstones (optional)
- Black licorice pieces or mini chocolate chips (optional)
Instructions
- Prepare the chocolate pudding: In a medium bowl, whisk together the instant chocolate pudding mix and cold milk. Stir vigorously for about 2 minutes until thickened. Refrigerate for 5 minutes to set.
- Whip the heavy cream until soft peaks form (3-5 minutes with electric mixer). Gently fold whipped cream into pudding for fluffier texture. Skip if not using.
- Crush Oreos in a large zip-top bag using a rolling pin until mostly small crumbs with some larger chunks remain.
- Assemble dirt cups by layering about 2 tablespoons of crushed Oreos at the bottom of each cup, then add about 1/4 cup (60ml) pudding. Repeat layers if cup is tall enough, finishing with a top layer of crushed Oreos.
- Add gummy worms partially into the top Oreo layer so they peek out. Place cookie or candy tombstones upright and add licorice pieces or chocolate chips for decoration.
- Chill assembled cups in the refrigerator for at least 30 minutes before serving.
- Serve cold and enjoy.
Notes
Do not crush Oreos too finely to maintain soil-like texture. Chill pudding before assembling to prevent sogginess. Whip cream just until soft peaks form to avoid grainy texture. Add gummy worms and decorations just before serving for freshness. Can be made up to 24 hours ahead and stored covered in fridge.
Nutrition
- Serving Size: 1 cup (240ml)
- Calories: 280320
- Fat: 1215
- Carbohydrates: 4045
- Protein: 46
Keywords: Halloween dessert, Oreo dirt cups, spooky treats, easy pudding cups, gummy worms dessert, Halloween party food


