Love this? Save it for later!
Share the inspiration with your friends
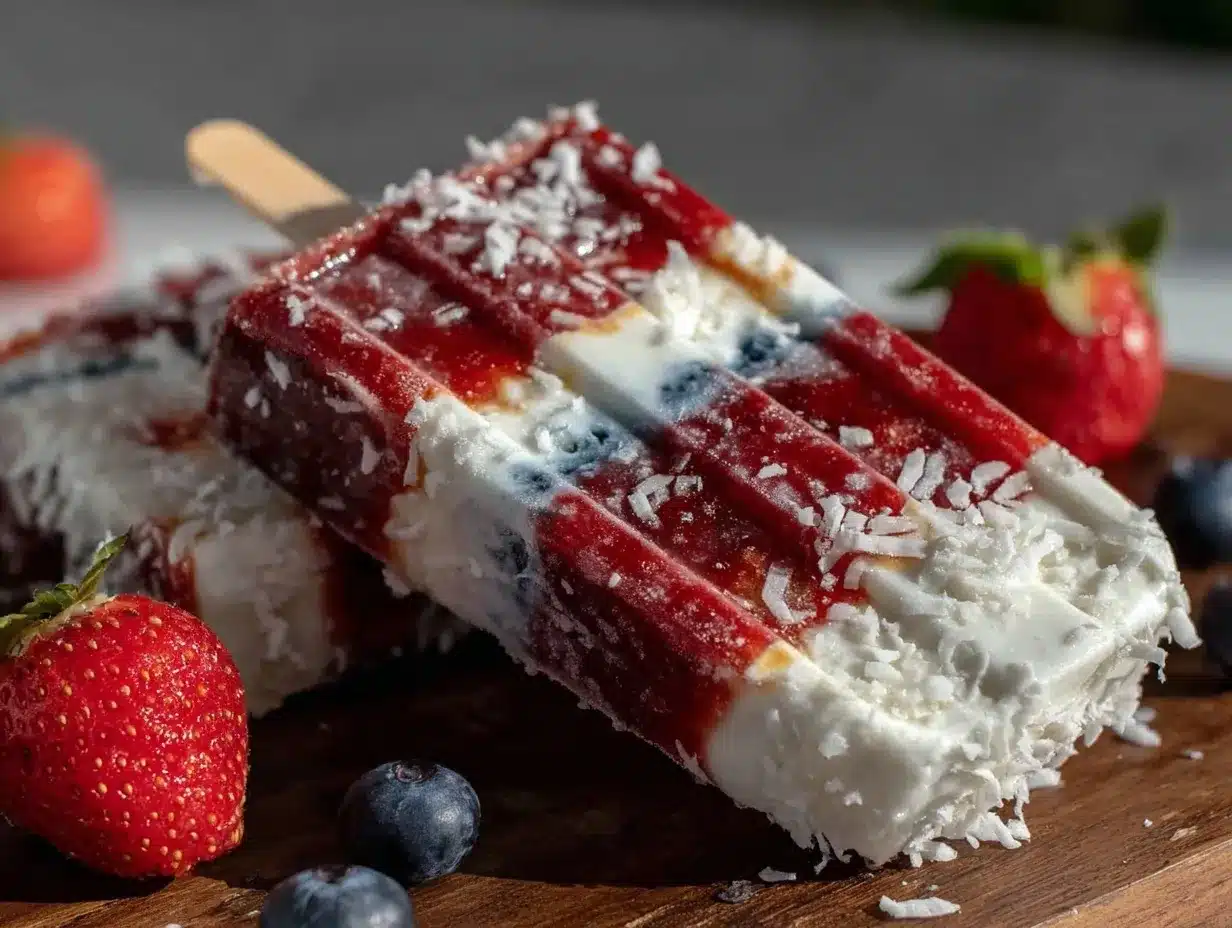
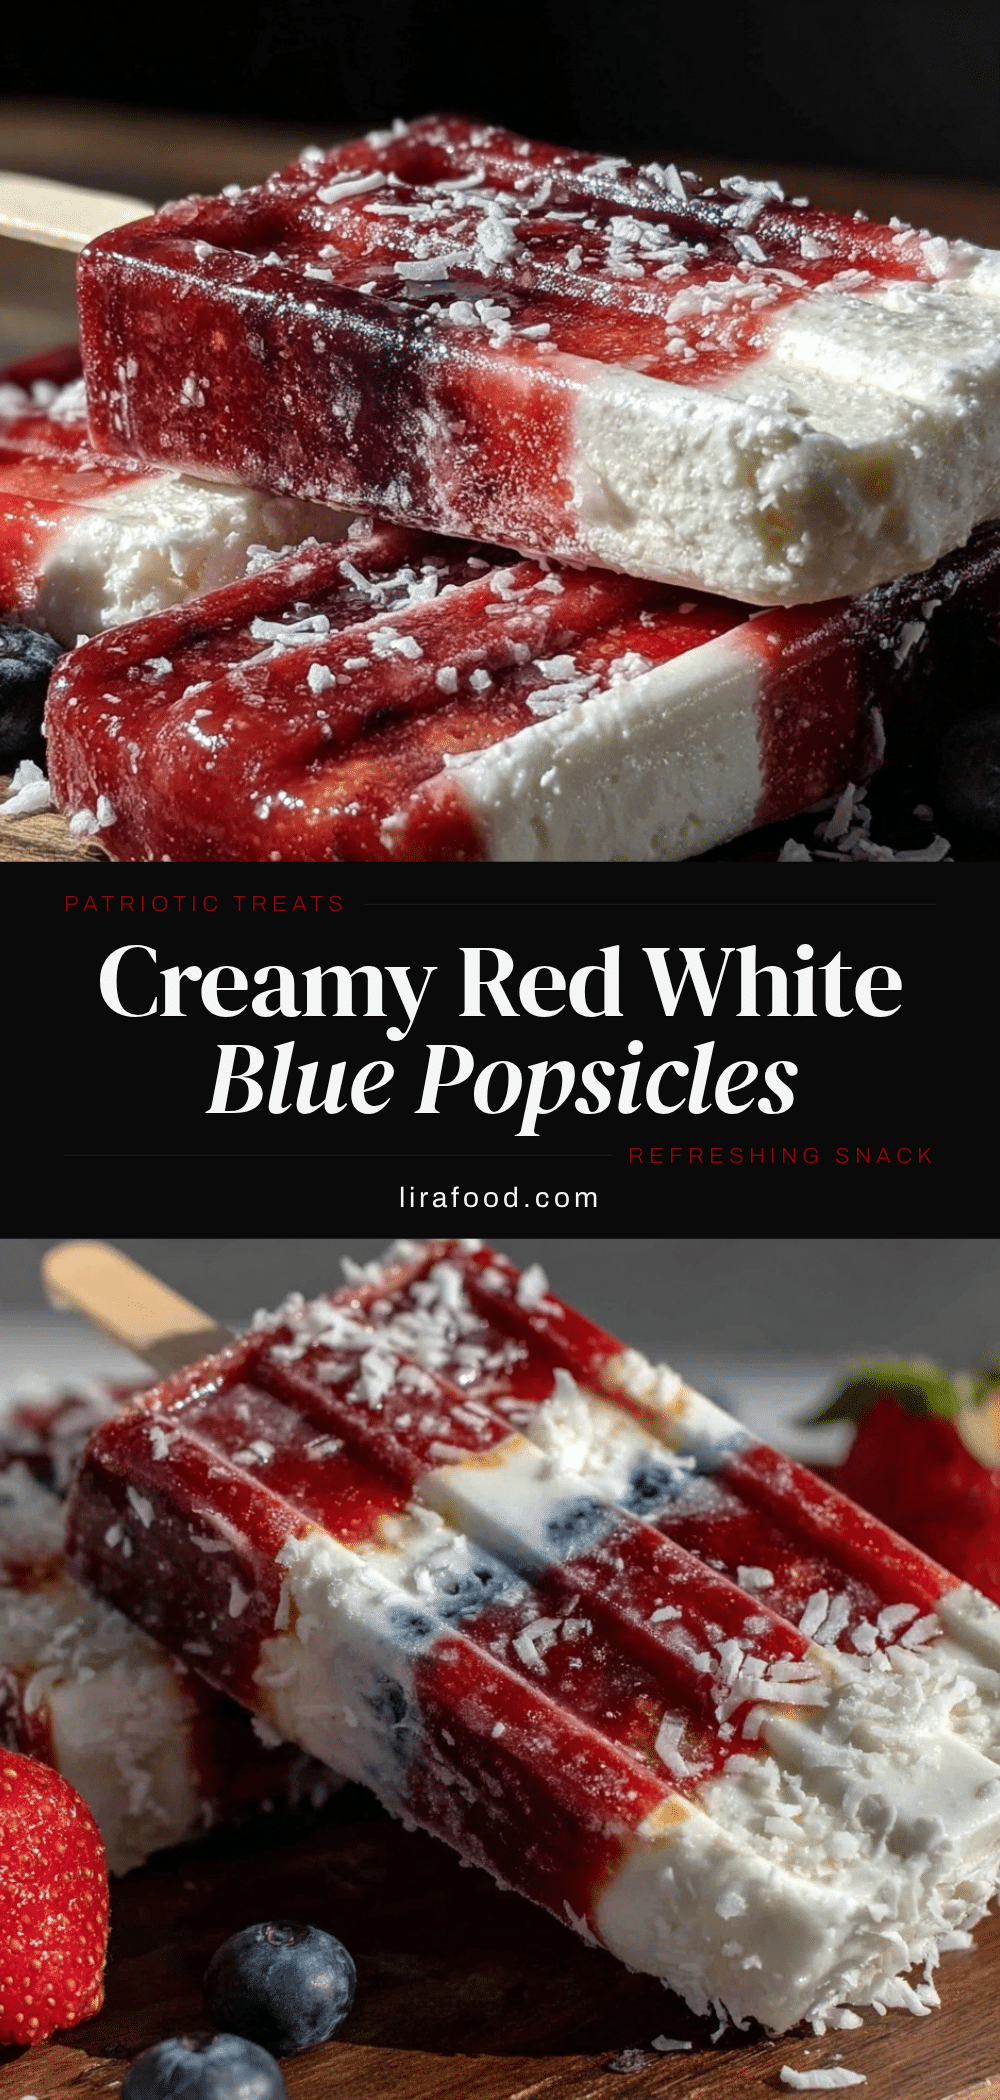
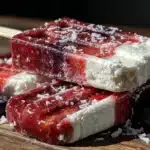
The other afternoon, I was wandering through the frozen aisle of my local grocery store when a burst of coconut aroma caught me off guard — and suddenly I was seven years old again, sitting on the cracked concrete steps of my old apartment building, holding a melting popsicle that dripped sticky red, white, and blue colors down my wrist. It was a sweltering July day, and the air buzzed with the distant hum of neighborhood barbecues and kids chasing each other around the sprinkler. I can still feel the rough edges of the popsicle stick and taste the creamy coconut layers mingling with tart berries.
Honestly, that fleeting scent in the store reignited a craving I hadn’t realized was tucked away under years of grown-up cooking experiments. I decided then to recreate those creamy red, white, and blue popsicles with coconut layers — not just for the taste but for that exact feeling, the sticky, sweet, and cool memory that lingers on a hot summer afternoon. Maybe you’ve been there too, chasing a flavor that transports you back without warning.
Let me tell you, crafting these popsicles wasn’t all smooth sailing; I forgot to freeze one layer fully once and ended up with a bit of a swirl instead of neat stripes. But that little mishap only made the treat more fun. These popsicles have since become my go-to for easy, festive treats that bring a little nostalgia and a lot of smiles.
Why You’ll Love This Recipe
After testing countless versions of creamy red, white, and blue popsicles with coconut layers, I can honestly say this recipe hits the sweet spot for flavor, texture, and ease. If you’re chasing a treat that feels special but isn’t a hassle, this one’s for you.
- Quick & Easy: Ready in under 30 minutes of hands-on time, perfect for last-minute summer cravings or casual get-togethers.
- Simple Ingredients: No need to hunt down fancy stuff — most are pantry staples or easy to find at any supermarket.
- Perfect for Summer Parties: These popsicles bring a festive vibe that’s great for July 4th, barbecues, or just brightening up an ordinary afternoon.
- Crowd-Pleaser: Kids adore them, and adults appreciate the creamy coconut layers balancing the fruity flavors.
- Unbelievably Delicious: The combination of smooth coconut, tart berries, and a hint of natural sweetness creates a refreshing, nostalgic treat.
What sets this recipe apart is the layering technique that keeps the popsicles visually stunning and texturally interesting. The creamy coconut layers aren’t just a filler; they add richness and a tropical twist that turns a simple popsicle into a mini celebration. Honestly, the first bite makes you want to close your eyes and savor the summer vibes all over again.
What Ingredients You Will Need
This recipe uses simple, wholesome ingredients to deliver bold flavor and satisfying texture without the fuss. Most are pantry staples, with fresh or frozen berries giving those vibrant pops of red and blue.
- For the Red Layer:
- 1 cup fresh or frozen strawberries, hulled and sliced (fresh adds brightness; frozen works well too)
- 1 tablespoon honey or maple syrup (adjust sweetness to taste)
- 1 teaspoon fresh lemon juice (to brighten the flavor)
- For the White Coconut Layer:
- 1 cup full-fat coconut milk (I prefer Thai Kitchen brand for creaminess)
- 2 tablespoons sweetened shredded coconut (adds texture and extra coconut flavor)
- 1 tablespoon powdered sugar or to taste (optional, balances the tartness)
- 1/2 teaspoon pure vanilla extract
- For the Blue Layer:
- 1 cup fresh or frozen blueberries
- 1 tablespoon honey or maple syrup
- 1 teaspoon fresh lemon juice
- Extras:
- Popsicle molds and sticks
- Optional: A pinch of sea salt in each fruit layer to deepen flavor
If you want a dairy-free option, the coconut milk is perfect as-is. For a lighter version, use light coconut milk, but keep in mind it won’t be as creamy. Frozen berries work wonderfully when fresh aren’t in season — just thaw them slightly before blending. And if you prefer less sweetness, you can always skip the added honey or syrup.
Equipment Needed
- Popsicle molds — any shape will do, but molds with wider cavities make layering easier.
- Blender or food processor — for pureeing the berries smoothly.
- Mixing bowls — at least three, to prepare each layer separately.
- Measuring cups and spoons — precise measurements help maintain balance and consistency.
- Spoons or small ladles — useful for pouring layers carefully into molds.
Honestly, I’ve used everything from fancy silicone molds to simple plastic cups with wooden sticks, and they all work well. If you don’t have a blender, a fork can mash berries, but the texture won’t be as smooth. For a budget-friendly option, check dollar stores for molds — they often have fun shapes that kids love.
Preparation Method
- Prep the Red Berry Layer:
Start by pureeing the strawberries with honey and lemon juice in your blender until smooth. Taste and adjust sweetness if needed. Pour about 1/3 cup (80 ml) of the puree into each popsicle mold, filling just a third of the way.
Freeze for 30-40 minutes or until firm to the touch but not rock solid.
- Make the Coconut Layer:
While the red layer chills, whisk together the coconut milk, shredded coconut, powdered sugar, and vanilla extract in a bowl. The sweetness should be subtle but noticeable.
Once the red layer is firm, gently spoon or pour about 1/3 cup (80 ml) of the coconut mixture over it. Freeze again for another 30-40 minutes.
- Prepare the Blueberry Layer:
Blend blueberries with honey and lemon juice until smooth. Pour this final layer over the frozen coconut layer, filling molds to the top.
Insert popsicle sticks and freeze for at least 4 hours, preferably overnight, until fully set.
- Unmolding Tips:
Run warm water over the outside of the molds for a few seconds to loosen popsicles before carefully pulling them out.
One time, I rushed and didn’t freeze the coconut layer fully before adding the blueberry, which led to a bit of mixing — it wasn’t perfect, but the taste was just fine. So if you’re in a hurry, don’t stress too much! The key is to let each layer firm up enough to hold its shape but not freeze so hard that the layers don’t stick together.
Cooking Tips & Techniques
Layering popsicles might seem straightforward, but a few tips can make a big difference in how they turn out.
- Freeze Time is Everything: Let each layer set until it’s firm but not rock hard — around 30-40 minutes works well. This prevents colors from blending too much but helps them adhere.
- Pour Gently: Use a spoon or small ladle to add layers slowly. Pouring too fast can break or mix the frozen layer below.
- Texture Balance: The shredded coconut adds a lovely chew to the creamy coconut layer, but too much can make it gritty. Stick to 2 tablespoons for best results.
- Sweetness Adjustment: The berries vary in sweetness seasonally, so taste your purees before layering. You can always add a touch more honey or lemon to balance.
- Patience Pays Off: I’ve learned the hard way — rushing the freeze times leads to messy layers. Set a timer and enjoy the anticipation!
Variations & Adaptations
This recipe is pretty flexible, so feel free to tailor it to your taste or dietary needs.
- Dairy-Free and Vegan: Stick with coconut milk throughout and use maple syrup instead of honey.
- Different Berries: Swap strawberries and blueberries for raspberries, blackberries, or even a tropical mango layer for a fun twist.
- Alcohol-Infused Popsicles: Add a splash of vodka or rum to the berry layers to transform these into adult-friendly treats (reduce freezing time accordingly).
- Lower Sugar: Use unsweetened coconut milk and sweeten fruit layers lightly or not at all for a fresher taste.
- Personal Touch: I once added a pinch of cinnamon to the coconut layer for a subtle warmth that surprised everyone — give it a try if you like spice!
Serving & Storage Suggestions
These creamy red, white, and blue popsicles are best served straight from the freezer. Let them sit at room temperature for a minute or two if they seem too hard to bite.
They pair wonderfully with a cool glass of lemonade or iced tea, and they’re a colorful addition to any summer spread. For a festive touch, serve them on a platter lined with fresh mint or edible flowers.
Store popsicles in an airtight container or wrap them individually in plastic wrap to prevent freezer burn. They’ll keep well for up to two weeks.
For reheating, well, popsicles are meant to stay cold — but if they soften too much, just pop them back in the freezer for a while. The flavors actually deepen a bit after sitting frozen for a day or two, making each bite more harmonious.
Nutritional Information & Benefits
Each popsicle contains roughly 100-120 calories, depending on the size and sweetness level. They offer a good dose of vitamin C from the berries and healthy fats from the coconut milk, which helps keep you satisfied.
The shredded coconut adds fiber and a bit of texture, while the natural sugars in honey or maple syrup keep this treat on the lighter side compared to store-bought options loaded with artificial sweeteners.
This recipe is naturally gluten-free and can easily be made vegan, making it friendly for a variety of diets. Just be mindful if you’re avoiding added sugars or have nut allergies (some coconut products may be processed in facilities with nuts).
Conclusion
If you’re looking for a way to bring a little summer magic into your kitchen, these creamy red, white, and blue popsicles with coconut layers are a perfect choice. They’re simple, fun to make, and carry that nostalgic vibe that makes you pause and smile — like holding a piece of a warm memory in your hand.
Feel free to tweak the layers, sweetness, or fruit choices to match your personal cravings. I love how this recipe invites creativity while still delivering that classic popsicle joy.
Give it a try, and let me know how your popsicles turn out — I’m always excited to hear about your takes and tweaks. Here’s to cool treats and sweet memories!
FAQs
Can I use frozen berries instead of fresh?
Absolutely! Frozen berries work well; just thaw them slightly before blending to make pureeing easier and to maintain smooth layers.
How do I prevent the layers from mixing?
Freeze each layer until it’s firm to the touch before adding the next. Pour the next layer gently with a spoon or ladle to avoid breaking the frozen base.
Can I make these popsicles ahead of time?
Yes, you can prepare the popsicles and freeze them for up to two weeks. Just store them in an airtight container or wrap them individually.
What if I don’t have popsicle molds?
Use small paper cups or silicone muffin liners and insert wooden sticks. Just make sure to cover the top loosely with foil to hold sticks upright while freezing.
Is there a way to make these popsicles less sweet?
Definitely. You can reduce or omit the honey/maple syrup in the fruit and coconut layers to suit your taste. The natural fruit flavors will still shine through.
For those who enjoy a creamy frozen treat, you might also appreciate the classic homemade vanilla ice cream or the refreshing citrus mint watermelon sorbet recipes on this site, which share that easy-to-love, homemade vibe.
Pin This Recipe!
Creamy Red White and Blue Popsicles Recipe Easy Homemade Coconut Layers Treats
These creamy red, white, and blue popsicles feature layered coconut milk and berry purees, creating a nostalgic, refreshing summer treat that’s easy to make and perfect for parties.
- Prep Time: 15 minutes
- Cook Time: 4 hours 40 minutes
- Total Time: 4 hours 55 minutes
- Yield: 6 popsicles 1x
- Category: Dessert
- Cuisine: American
Ingredients
- 1 cup fresh or frozen strawberries, hulled and sliced
- 1 tablespoon honey or maple syrup (adjust sweetness to taste)
- 1 teaspoon fresh lemon juice
- 1 cup full-fat coconut milk
- 2 tablespoons sweetened shredded coconut
- 1 tablespoon powdered sugar (optional)
- 1/2 teaspoon pure vanilla extract
- 1 cup fresh or frozen blueberries
- 1 tablespoon honey or maple syrup
- 1 teaspoon fresh lemon juice
- Popsicle molds and sticks
- Optional: A pinch of sea salt in each fruit layer to deepen flavor
Instructions
- Puree the strawberries with honey and lemon juice in a blender until smooth. Taste and adjust sweetness if needed. Pour about 1/3 cup (80 ml) of the puree into each popsicle mold, filling one third of the way.
- Freeze for 30-40 minutes or until firm to the touch but not rock solid.
- Whisk together the coconut milk, shredded coconut, powdered sugar, and vanilla extract in a bowl.
- Once the red layer is firm, gently spoon or pour about 1/3 cup (80 ml) of the coconut mixture over it. Freeze again for another 30-40 minutes.
- Blend blueberries with honey and lemon juice until smooth. Pour this final layer over the frozen coconut layer, filling molds to the top.
- Insert popsicle sticks and freeze for at least 4 hours, preferably overnight, until fully set.
- To unmold, run warm water over the outside of the molds for a few seconds to loosen popsicles before carefully pulling them out.
Notes
Freeze each layer until firm but not rock hard to prevent mixing. Pour layers gently to maintain distinct stripes. Use full-fat coconut milk for creaminess or light coconut milk for a lighter version. Frozen berries should be thawed slightly before blending. Optional pinch of sea salt enhances flavor. For vegan version, use maple syrup instead of honey.
Nutrition
- Serving Size: 1 popsicle
- Calories: 110
- Sugar: 10
- Sodium: 20
- Fat: 7
- Saturated Fat: 6
- Carbohydrates: 13
- Fiber: 2
- Protein: 1
Keywords: popsicles, coconut, red white and blue, summer treats, layered popsicles, berry popsicles, homemade popsicles, dairy-free, vegan option