Love this? Save it for later!
Share the inspiration with your friends
“I wasn’t planning on making dessert that day,” I remember telling my friend Lisa as we prepped for our annual July 4th picnic. The sun was blazing, and honestly, the idea of turning on the oven seemed like a cruel joke. But then, Lisa pulled out this simple little recipe for Easy Red, White & Blue Berry Trifle Cups that she’d scribbled on a napkin during her last trip to the farmers market. She promised it was a crowd-pleaser, and I was skeptical—because you know that feeling when you think something this easy can’t possibly taste amazing?
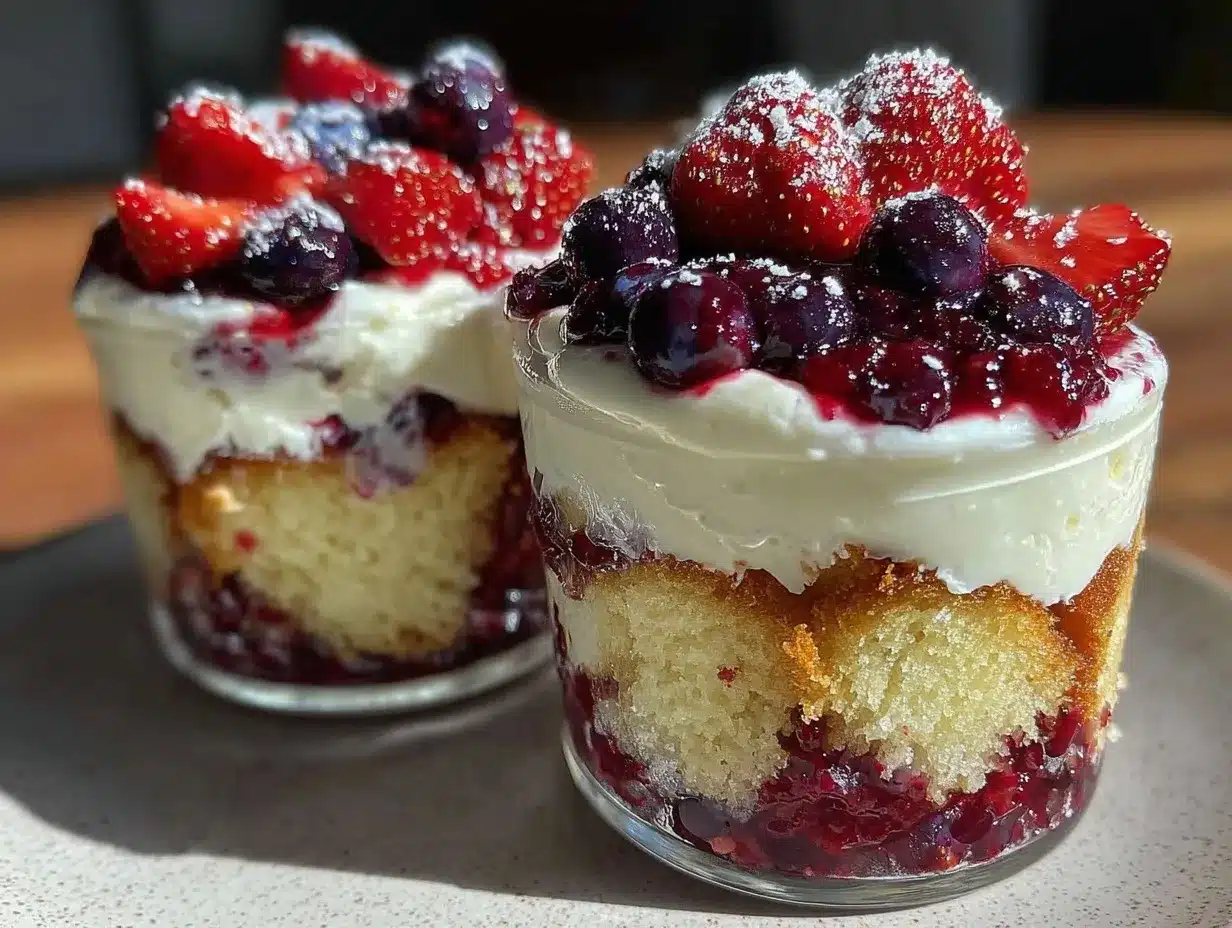
Well, I was wrong. The sweet layers of fluffy cake, creamy vanilla pudding, and fresh berries came together in these adorable little cups that looked like summer in a glass. I made a bit of a mess trying to get the layers just right—some pudding dripped down the sides, and I forgot to chill the cups before serving—but it didn’t matter. Everyone at the picnic kept coming back for more. It was the kind of recipe that feels effortless but leaves a lasting impression, perfect for those busy summer days when you want something festive without fuss.
If you’re looking for a recipe that’s as patriotic as it is tasty, and honestly, a little bit fun to make, these trifle cups are going to be your new go-to. Whether you’re serving at a backyard barbecue, a potluck, or just treating yourself on a sunny afternoon, this recipe has a way of making simple ingredients shine.
Why You’ll Love This Recipe
Let me tell you, after testing and tweaking this Easy Red, White & Blue Berry Trifle Cups recipe a few times, I’m convinced it’s a winner for all the right reasons. Here’s what makes it stand out:
- Quick & Easy: Comes together in under 30 minutes — perfect for last-minute gatherings or when you just want something sweet without the wait.
- Simple Ingredients: No need for fancy or hard-to-find items. You probably have most of these in your pantry already!
- Perfect for Summer Parties: The fresh berries and light pudding scream warm-weather vibes, making it ideal for 4th of July celebrations or casual weekend get-togethers.
- Crowd-Pleaser: Kids and adults alike adore the mix of textures and flavors — it’s colorful, fun, and tasty.
- Unbelievably Delicious: The combination of fluffy cake, creamy pudding, and juicy berries hits all the right notes without being overly sweet.
What really makes this recipe different is the layering technique I picked up from a pastry chef friend — it gives the trifle a perfect balance without turning into a soggy mess. Plus, I swap out traditional whipped cream for a lightly sweetened vanilla pudding for a smoother, creamier texture. Honestly, it’s the kind of dessert that gets you closing your eyes after the first bite because it’s just that satisfying.
What Ingredients You Will Need
This recipe relies on simple, wholesome ingredients to deliver a fresh, festive treat without any fuss. Most are pantry staples or easy to find fresh at your local market.
- Yellow or white cake: Use a store-bought pound cake or angel food cake, cut into 1-inch cubes (about 4 cups). I prefer Sara Lee pound cake for its moist texture.
- Vanilla pudding: 2 cups prepared instant vanilla pudding (or homemade if you have the time). I like using Jell-O instant pudding mix for convenience.
- Fresh strawberries: Sliced (about 1 cup). Choose firm, ripe berries for the best flavor.
- Blueberries: Washed and patted dry (about 1 cup). Wild blueberries work great if you can find them.
- Whipped cream: 1 cup, lightly sweetened. You can use store-bought or make your own. For a dairy-free option, try coconut whipped cream.
- Sugar: 1 tablespoon (optional, to sprinkle over berries if they’re tart).
- Fresh mint leaves: A few for garnish (optional but adds a nice fresh touch).
Feel free to swap the berries for whatever’s in season — raspberries or blackberries make a great substitute. Also, for a gluten-free option, gluten-free cake or ladyfingers work beautifully here.
Equipment Needed
- Mixing bowls (medium and large sizes)
- Measuring cups and spoons
- Sharp knife for slicing cake and berries
- Small dessert cups or clear glasses (about 6-8, 8-ounce size)
- Spatula or spoon for layering puddings and cream
- Whisk (if making homemade pudding or whipped cream)
If you don’t have fancy dessert cups, no worries — small mason jars or even regular drinking glasses work perfectly. I once made these in plastic party cups when I forgot my usual glasses, and it worked just fine! Oh, and a serrated knife helps slice the cake cubes cleanly without squishing them.
Preparation Method
- Prepare the pudding: If using instant pudding mix, whisk together with cold milk according to package instructions (usually 2 cups milk for 1 package). Let it set in the fridge for about 5 minutes to thicken.
- Slice the cake: Cut your pound or angel food cake into roughly 1-inch cubes. Try to keep them uniform so the layers look neat. This should yield about 4 cups of cake cubes.
- Prepare the berries: Rinse strawberries and blueberries under cold water. Slice strawberries into thin pieces and pat all berries dry with paper towels. If your strawberries are tart, sprinkle them lightly with sugar and let sit for 10 minutes to macerate.
- Layer the first cake layer: Place about 2-3 cubes of cake at the bottom of each dessert cup (approximately 1/3 cup). This forms the base.
- Add pudding layer: Spoon about 2 tablespoons of vanilla pudding over the cake cubes, spreading gently to cover them completely. This is key to keeping the cake moist but not soggy.
- Layer the berries: Add a mix of sliced strawberries and blueberries (about 2 tablespoons), distributing evenly among the cups.
- Add whipped cream: Dollop about 1 tablespoon of lightly sweetened whipped cream on top of the berries.
- Repeat layers: Add another layer of cake cubes (2-3 cubes), more pudding (2 tablespoons), berries (2 tablespoons), and finish with a final whipped cream topping.
- Garnish and chill: Garnish each cup with a small sprig of fresh mint and a few extra berries. Cover cups with plastic wrap and refrigerate for at least 1 hour before serving. This chilling step lets the flavors meld and the pudding set perfectly.
Pro tip: If you find your pudding is too thick, whisk in a tablespoon of milk before layering to loosen it slightly. When you spoon the pudding, try not to press down too hard to keep the layers distinct and pretty. Also, I sometimes get a little impatient and skip chilling — but trust me, the flavor is worth the wait!
Cooking Tips & Techniques
When making these trifle cups, timing and layering technique really matter. Here are some tips from my many experiments:
- Keep cake fresh: Use cake that’s a day old or fresh from the bakery. Day-old cake soaks up pudding better without falling apart.
- Don’t over-saturate: Spoon pudding gently and avoid drenching the cake. Too much moisture and your trifle turns mushy.
- Whip cream just right: Whip cream until it holds soft peaks for a light texture. Over-whipping will make it grainy and stiff.
- Choose ripe berries: Fresh, firm berries give the best texture contrast. Mushy or underripe berries throw off the balance.
- Layer with care: Use a small spoon or offset spatula for neater layers. It’s worth the little extra effort for presentation.
- Chill well: Don’t skip the chilling step. It helps the layers set and the flavors marry beautifully.
One time I tried to speed things up by layering everything straight from the fridge. The pudding was too cold and thick, making it hard to spread evenly. Lesson learned: let pudding sit a few minutes at room temp before layering for a smoother finish.
Variations & Adaptations
This recipe is super flexible — here are some ways to switch things up:
- Dairy-free version: Use coconut milk pudding and coconut whipped cream. The tropical twist is surprisingly delicious.
- Seasonal berries: Swap in raspberries or blackberries in fall or winter when strawberries might be scarce or pricey.
- Chocolate lover’s: Use chocolate pudding instead of vanilla and add mini chocolate chips between layers.
- Adult twist: Add a splash of your favorite liqueur (like Grand Marnier or amaretto) to the pudding for a grown-up flavor.
- Low-carb option: Substitute cake cubes with almond flour-based cake or keto-friendly sponge cake.
Personally, I once made a batch using pound cake soaked lightly in lemon syrup with mixed berries and it was a hit at a summer brunch — the lemon really brightened the flavors.
Serving & Storage Suggestions
Serve these trifle cups chilled, straight from the refrigerator. They look so inviting in clear cups, showing off the red, white, and blue layers — perfect for patriotic holidays or just a sunny day treat.
Pair with light beverages like sparkling lemonade, iced tea, or even a fruity sangria for summer parties. For a fuller meal, try serving alongside grilled chicken skewers or fresh salads to balance the sweetness.
Store leftovers tightly covered in the fridge for up to 2 days. The flavors deepen over time, but the cake may soften a bit more. If you want to prepare ahead, assemble everything except the whipped cream topping and add it just before serving.
Reheat is not recommended here — these cups are best served cold and fresh.
Nutritional Information & Benefits
Each serving of these Easy Red, White & Blue Berry Trifle Cups is roughly 250 calories, depending on the cake and pudding used. The fresh berries boost the vitamin C and antioxidant content, making this dessert a little healthier than most.
The pudding provides calcium and protein, while using fresh fruit adds fiber and natural sweetness. For those watching sugar intake, you can reduce added sugars by choosing sugar-free pudding mixes or lightly sweetening the whipped cream.
This recipe is naturally gluten-containing unless you swap in gluten-free cake options, and it contains dairy unless adapted with dairy-free alternatives.
From a wellness standpoint, it’s a dessert that feels indulgent but doesn’t overwhelm, making it a guilt-free treat for summer celebrations.
Conclusion
The charm of these Easy Red, White & Blue Berry Trifle Cups lies in their simplicity and festive flair. They’re proof that you don’t need to spend hours or have fancy skills to make a dessert that wows your guests and tastes fantastic. I love how customizable and forgiving this recipe is — it encourages you to make it your own.
So go ahead, gather your cake, pudding, and berries, and give these trifle cups a try. I promise you’ll find yourself reaching for them again and again when summer rolls around. Let me know how your version turns out or if you tried any fun twists — I’m always excited to hear your stories!
Happy layering and happy eating!
FAQs
Can I make these trifle cups ahead of time?
Yes! You can assemble them a few hours ahead and keep them refrigerated. Just add the whipped cream topping right before serving to keep it fresh.
What can I use if I don’t have instant pudding mix?
You can make homemade vanilla pudding using milk, sugar, cornstarch, and vanilla extract. There are plenty of simple recipes online that work well for this.
How long do these trifle cups keep in the fridge?
They stay fresh for about 2 days. After that, the cake tends to get soggy and the texture changes.
Can I use frozen berries instead of fresh?
Frozen berries work in a pinch but drain any excess juice before layering to avoid watery trifle cups.
Is there a way to make these trifle cups vegan?
Absolutely! Use a plant-based cake, dairy-free pudding (coconut or almond milk-based), and coconut whipped cream for a vegan-friendly dessert.
Pin This Recipe!
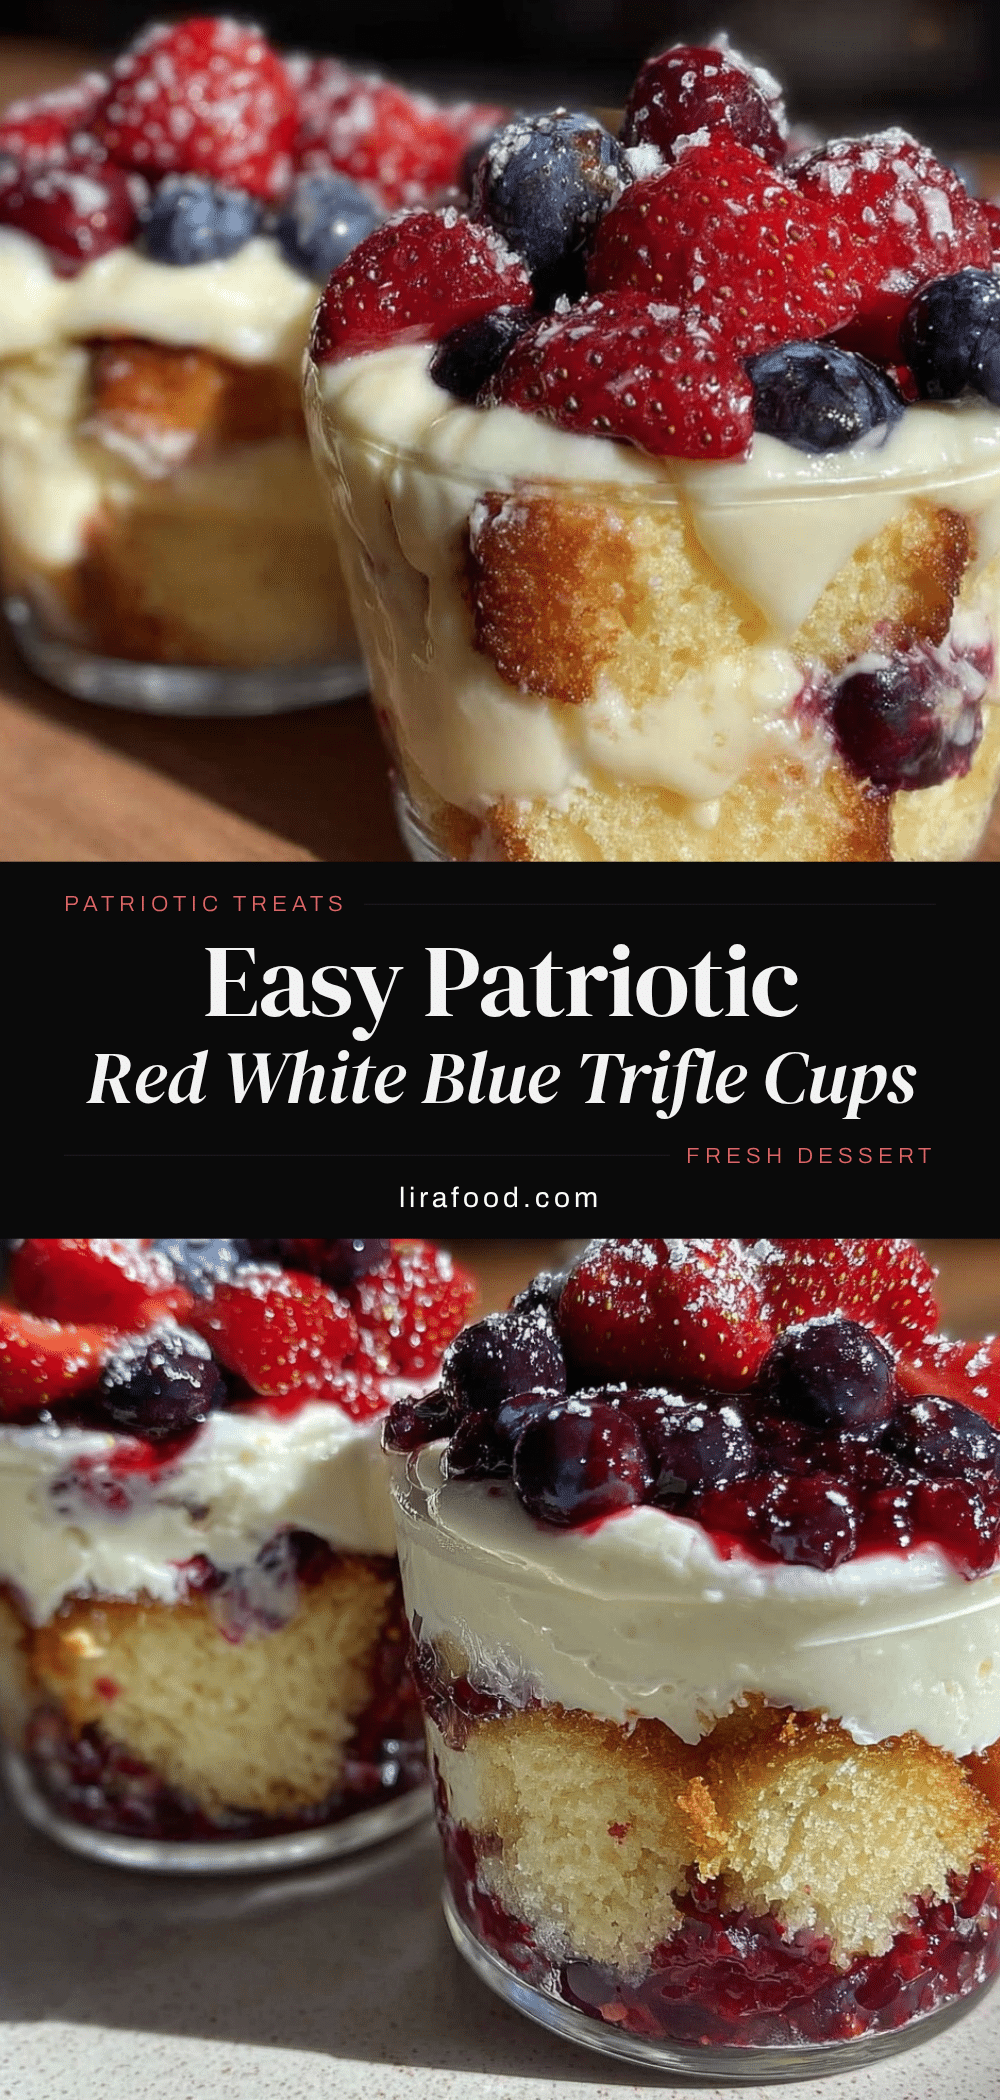
Easy Red White Blue Berry Trifle Cups

A quick and festive dessert featuring layers of fluffy cake, creamy vanilla pudding, and fresh berries, perfect for summer parties and patriotic celebrations.
- Prep Time: 15 minutes
- Cook Time: 0 minutes
- Total Time: 1 hour 15 minutes
- Yield: 6-8 servings 1x
- Category: Dessert
- Cuisine: American
Ingredients
- 4 cups yellow or white cake, cut into 1-inch cubes (store-bought pound cake or angel food cake)
- 2 cups prepared instant vanilla pudding (or homemade)
- 1 cup fresh strawberries, sliced
- 1 cup blueberries, washed and patted dry
- 1 cup lightly sweetened whipped cream
- 1 tablespoon sugar (optional, to sprinkle over berries if tart)
- Fresh mint leaves for garnish (optional)
Instructions
- Prepare the pudding: whisk instant pudding mix with 2 cups cold milk according to package instructions and refrigerate for 5 minutes to thicken.
- Slice the cake into roughly 1-inch cubes, about 4 cups total.
- Rinse strawberries and blueberries under cold water. Slice strawberries thinly and pat all berries dry. If strawberries are tart, sprinkle with sugar and let sit for 10 minutes.
- Layer 2-3 cubes of cake (about 1/3 cup) at the bottom of each dessert cup.
- Spoon about 2 tablespoons of vanilla pudding over the cake cubes, spreading gently.
- Add about 2 tablespoons of mixed sliced strawberries and blueberries evenly over the pudding.
- Dollop about 1 tablespoon of lightly sweetened whipped cream on top of the berries.
- Repeat the layers: add another 2-3 cubes of cake, 2 tablespoons pudding, 2 tablespoons berries, and finish with a final whipped cream topping.
- Garnish each cup with a small sprig of fresh mint and a few extra berries.
- Cover cups with plastic wrap and refrigerate for at least 1 hour before serving.
Notes
Use day-old cake for better absorption without sogginess. Whip cream to soft peaks for best texture. Chill at least 1 hour for flavors to meld. For dairy-free, use coconut milk pudding and coconut whipped cream. For gluten-free, substitute gluten-free cake or ladyfingers.
Nutrition
- Serving Size: 1 trifle cup (about
- Calories: 250
- Sugar: 25
- Sodium: 150
- Fat: 8
- Saturated Fat: 4
- Carbohydrates: 38
- Fiber: 3
- Protein: 4
Keywords: trifle cups, summer dessert, patriotic dessert, berry trifle, easy dessert, no bake dessert, 4th of July dessert