Love this? Save it for later!
Share the inspiration with your friends
“I wasn’t planning on making dessert that day,” I admitted to my friend Lisa as we set up for the July 4th picnic. It was one of those bright, breezy afternoons where the park was buzzing with kids running around and grills firing up all over the place. Lisa had just handed me a basket of fresh berries she picked up from a little roadside stand—vibrant blueberries, plump strawberries, and juicy raspberries. The colors practically screamed ‘patriotic.’
Honestly, I wasn’t sure what to whip up on such short notice. But there’s something about fresh berries and creamy cheesecake that instantly feels like a celebration. So, with a cracked mixing bowl (don’t ask how) and a couple of detours—like forgetting the vanilla extract—I threw together what I now call the Perfect Berry Flag Cheesecake Bars.
You know that feeling when a simple dessert ends up stealing the show? This recipe did just that. It’s easy, festive, and has that classic creamy texture you crave, topped with fresh berries arranged like a little flag. Maybe you’ve been there, scrambling to bring something sweet that looks impressive but doesn’t require an entire day’s prep. Let me tell you, these cheesecake bars have become my go-to for patriotic celebrations ever since.
What makes it stick with me, beyond the taste, is how it brings people together—kids marvel at the berry “flag,” adults appreciate the balance of sweetness and tang, and I get to enjoy the scene without stress. So, whether you’re planning a backyard barbecue, a neighborhood potluck, or just want to add a little star-spangled fun to your dessert table, this recipe might just be your new favorite.
Why You’ll Love This Recipe
- Quick & Easy: Comes together in under 45 minutes, making it perfect for last-minute patriotic celebrations or spontaneous gatherings.
- Simple Ingredients: No need for fancy or hard-to-find items—you probably already have most of these in your pantry or fridge.
- Perfect for Patriotic Occasions: Ideal for 4th of July, Memorial Day, Labor Day, or anytime you want to add a festive touch to your dessert spread.
- Crowd-Pleaser: The creamy cheesecake base paired with fresh berries is a hit with both kids and adults, always disappearing fast!
- Unbelievably Delicious: The smooth, velvety cheesecake layer with a buttery crust and juicy berries creates an irresistible flavor and texture combo.
- What Makes It Different: This isn’t just any cheesecake bar—arranging the berries to resemble a flag adds a playful, patriotic twist that’s both visually striking and fun to make.
- Home-Tested & Family-Approved: After several test runs, the balance of sweetness and tartness is spot-on, and the crust stays perfectly crumbly without getting soggy.
This recipe strikes that sweet spot between simple and stunning. It’s the kind of dessert that makes you close your eyes on the first bite and smile, knowing you nailed it. Whether you’re impressing guests or just enjoying a quiet moment with a slice, these Perfect Berry Flag Cheesecake Bars bring a little extra joy to the table.
What Ingredients You Will Need
This recipe uses straightforward, wholesome ingredients to deliver that classic cheesecake flavor with a fresh, fruity twist. Most are pantry staples, plus the fresh berries add that seasonal pop of color and taste.
- For the Crust:
- 1½ cups graham cracker crumbs (about 10 full sheets) – I like using Honey Maid for the best texture
- 5 tablespoons unsalted butter, melted (adds richness and helps bind)
- 2 tablespoons granulated sugar (balances the crust sweetness)
- For the Cheesecake Filling:
- 16 oz (450 g) cream cheese, softened (room temperature is key for smooth mixing)
- ⅔ cup granulated sugar
- 2 large eggs, room temperature
- 1 teaspoon pure vanilla extract (don’t skip this—it’s essential for depth of flavor)
- ⅓ cup sour cream (adds creaminess and slight tang)
- For the Berry Topping:
- 1 cup fresh blueberries
- 1 cup fresh strawberries, hulled and sliced
- ½ cup fresh raspberries
- Optional: 1 tablespoon honey or powdered sugar for a touch of glaze
Ingredient Tips: If strawberries aren’t in season, frozen (thawed) can work but might be a bit juicier. For a gluten-free crust, substitute graham crackers with almond flour or gluten-free cookie crumbs. And if you’re dairy-free, try swapping cream cheese and sour cream with plant-based alternatives—though texture may vary slightly.
Equipment Needed
- 9×9-inch (23×23 cm) square baking pan – glass or metal both work fine
- Parchment paper – for easy removal of bars
- Mixing bowls – one large for crust, one for cheesecake filling
- Electric mixer or stand mixer – handheld works too, but mixer makes it smoother and quicker
- Measuring cups and spoons – for precise ingredient amounts
- Spatula – to scrape bowl sides and smooth batter
- Cooling rack – optional but helpful for quick cooling
In a pinch, a fork or whisk can mix the crust ingredients, but an electric mixer really helps with the cheesecake to avoid lumps. I’ve found parchment paper saves me a ton of cleanup hassle, but greasing the pan well can work if you’re out. A silicone spatula is my favorite for scraping every last bit of batter!
Preparation Method
- Preheat your oven to 325°F (163°C). Line your 9×9-inch pan with parchment paper, leaving some overhang for easy lifting later. This step saves you from a crumbly mess when cutting.
- Make the crust: In a medium bowl, combine 1½ cups graham cracker crumbs, 5 tablespoons melted butter, and 2 tablespoons sugar. Stir until well mixed and resembles wet sand. Press the mixture firmly and evenly into the bottom of your prepared pan using the back of a spoon or your fingers. Bake for 10 minutes. This helps the crust set and prevents sogginess.
- Prepare the cheesecake filling: While the crust bakes, beat the softened cream cheese with ⅔ cup sugar on medium speed until creamy and smooth, about 2-3 minutes. Scrape down the bowl as needed to avoid lumps.
- Add eggs one at a time: Beat in the eggs, one by one, making sure each is fully incorporated before adding the next. This helps keep the filling silky.
- Mix in vanilla and sour cream: Add 1 teaspoon vanilla extract and ⅓ cup sour cream. Blend until just combined—overmixing can cause cracks during baking.
- Pour filling over crust: Once crust is out of the oven and slightly cooled (about 5 minutes), pour the cheesecake mixture on top and smooth it out evenly with a spatula.
- Bake: Place in the oven and bake for 35-40 minutes, or until the edges are set but the center still jiggles slightly when you gently shake the pan. A little wobble means perfect creamy texture after cooling.
- Cool completely: Let the cheesecake bars cool on a wire rack for about 1 hour, then refrigerate for at least 4 hours or overnight for best results.
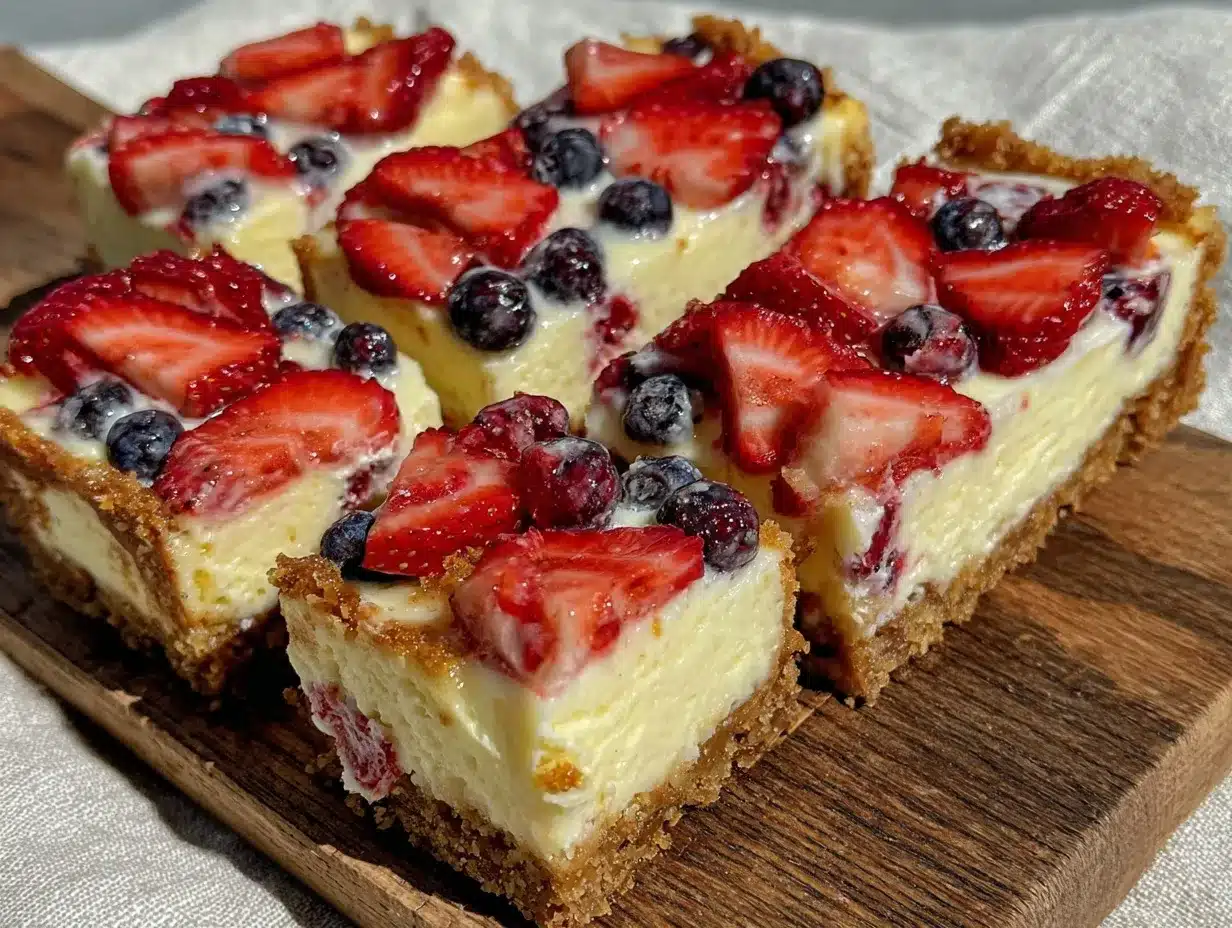
- Arrange the berry flag: Just before serving, arrange fresh blueberries in the top left corner to mimic the stars, then create alternating rows of sliced strawberries and raspberries for the stripes. If you want a slight shine, brush the berries lightly with honey or sift powdered sugar over the top.
- Slice and serve: Use a sharp knife dipped in hot water before each cut for clean slices. Lift bars out with the parchment overhang. Enjoy!
Pro tip: If cracks appear on top after baking, don’t fret—it’s normal. Cover with berries and it won’t matter one bit. Also, I’ve learned that letting the cream cheese come to room temperature ahead of time is a game-changer for a smooth batter.
Cooking Tips & Techniques
Making cheesecake bars can be intimidating, but these pointers help keep it smooth sailing:
- Soften cream cheese fully: Cold cream cheese lumps up and makes batter uneven. Leave it out 30-45 minutes before mixing.
- Mix gently after adding eggs: Overbeating introduces air, which can cause cracking. Mix just until combined.
- Don’t skip the sour cream: It adds moisture and a subtle tang that brightens the cheesecake flavor.
- Use room temperature eggs: They incorporate better and help prevent curdling.
- Watch your bake time carefully: Overbaking dries it out; underbaking leaves it too jiggly. Aim for edges set and a slight wobble in the center.
- Cool gradually: Sudden temperature changes can cause cracks. Let the cheesecake cool at room temperature before chilling in the fridge.
- Slicing tip: Warm your knife under hot water and wipe it clean between cuts for neat, clean bars.
Once, I forgot to line the pan and spent 15 minutes scraping bars off the pan with a spatula. Lesson learned! Parchment paper is your best friend here. Also, layering the berries is where the fun really begins—take your time arranging them for that wow factor.
Variations & Adaptations
- Gluten-Free Version: Substitute the graham cracker crumbs with almond flour or gluten-free cookie crumbs. The crust will be a bit more crumbly but equally delicious.
- Berry Mix Variations: Swap in blackberries or sliced kiwi for extra color contrast. In summer, fresh peaches or mango slices add a tropical twist.
- Lower Sugar Option: Use a sugar substitute like erythritol or monk fruit sweetener in both crust and filling. Be mindful it might alter texture slightly.
- Dairy-Free Adaptation: Try vegan cream cheese and coconut yogurt in place of cream cheese and sour cream. The flavor will be different but still tasty.
- Mini Cheesecake Bars: Use a mini muffin tin lined with parchment or silicone cups for individual servings—perfect for potlucks and parties.
Personally, I once made these bars with a lemon zest twist in the filling and it added a bright, refreshing note that paired beautifully with the berries. Feel free to experiment with spices like cinnamon or nutmeg in the crust for a cozy touch.
Serving & Storage Suggestions
These cheesecake bars are best served chilled, straight from the fridge, so the texture stays firm and creamy. For presentation, I like to serve them on a simple white platter to make the berry colors pop.
They pair wonderfully with a cup of iced tea, sparkling lemonade, or even a light rosé for grown-up gatherings. For a fun twist, add a dollop of whipped cream or a drizzle of chocolate sauce on the side.
Store leftover bars tightly covered in the refrigerator for up to 4 days. If you want to keep them longer, wrap tightly and freeze for up to 2 months. To thaw, place in the fridge overnight. Reheat is not recommended—serve cold for best flavor and texture.
Flavors tend to meld and deepen after a day, so if you can wait, making these a day ahead is a smart move for taste and convenience.
Nutritional Information & Benefits
Each serving of these cheesecake bars (assuming 16 bars per batch) contains approximately:
| Calories | 210 |
|---|---|
| Fat | 15g |
| Carbohydrates | 18g |
| Protein | 4g |
| Sugar | 12g (natural + added) |
The fresh berries provide antioxidants, fiber, and vitamin C, making this dessert not only tasty but a bit nourishing too. Using real cream cheese and sour cream adds protein and calcium, though these bars are definitely an indulgence best enjoyed in moderation.
For those watching carbs or sugar, the variations section has some great alternatives to tweak this recipe to fit your needs.
Conclusion
The Perfect Berry Flag Cheesecake Bars are a delightful, fuss-free way to bring a festive touch to any patriotic celebration. I love how simple ingredients and a little creative berry arrangement come together to create something both beautiful and delicious. Honestly, these bars have been the star of many a party, and I’m confident they’ll win over your family and friends too.
Feel free to make this recipe your own—swap berries, adjust sweetness, or try different crusts. I’d love to hear how you put your spin on it, so please share your thoughts and photos in the comments below. Here’s to sweet moments and star-spangled treats that bring everyone together!
FAQs
Can I make these cheesecake bars ahead of time?
Yes! In fact, they taste better if made a day ahead. Just keep them refrigerated and add the berry topping right before serving.
What if I don’t have graham crackers?
You can substitute with digestive biscuits, vanilla wafers, or even crushed pretzels for a salty-sweet crust.
How do I prevent cracks on the cheesecake surface?
Make sure not to overmix the batter, avoid rapid temperature changes, and bake until edges are set but center still jiggles slightly.
Can I use frozen berries for the topping?
Fresh berries are best for presentation and texture, but thawed frozen berries can work if you drain excess juice to avoid sogginess.
Is there a vegan version of this recipe?
Yes, swapping cream cheese and sour cream with vegan alternatives and using a plant-based crust works, though texture and flavor will differ somewhat.
Pin This Recipe!
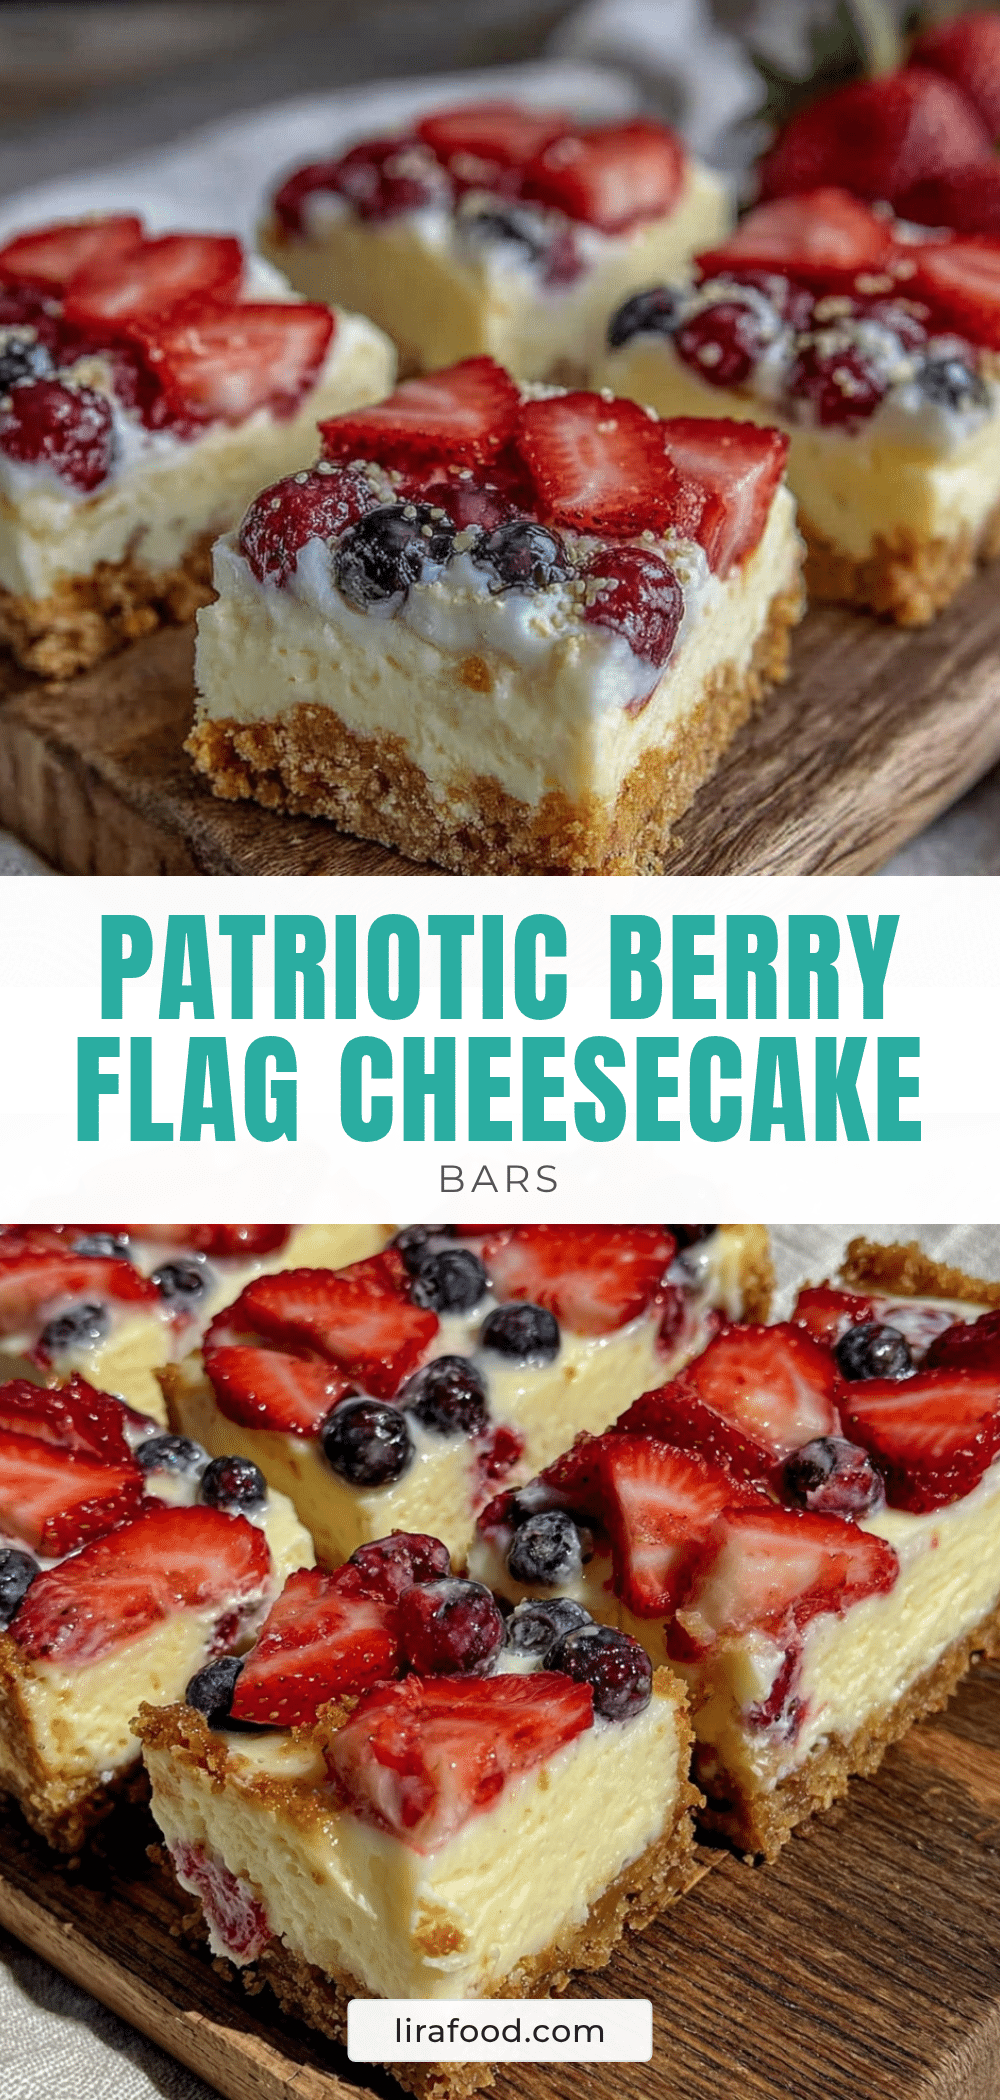
Perfect Berry Flag Cheesecake Bars
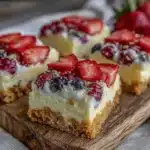
Easy, festive cheesecake bars topped with fresh berries arranged like a patriotic flag. Perfect for 4th of July and other celebrations, these bars combine a creamy cheesecake base with a buttery crust and juicy berries.
- Prep Time: 15 minutes
- Cook Time: 50 minutes
- Total Time: 5 hours 5 minutes
- Yield: 16 bars 1x
- Category: Dessert
- Cuisine: American
Ingredients
- 1½ cups graham cracker crumbs (about 10 full sheets)
- 5 tablespoons unsalted butter, melted
- 2 tablespoons granulated sugar
- 16 oz (450 g) cream cheese, softened
- ⅔ cup granulated sugar
- 2 large eggs, room temperature
- 1 teaspoon pure vanilla extract
- ⅓ cup sour cream
- 1 cup fresh blueberries
- 1 cup fresh strawberries, hulled and sliced
- ½ cup fresh raspberries
- Optional: 1 tablespoon honey or powdered sugar for glaze
Instructions
- Preheat your oven to 325°F (163°C). Line a 9×9-inch pan with parchment paper, leaving some overhang for easy lifting.
- Make the crust: In a medium bowl, combine graham cracker crumbs, melted butter, and sugar. Stir until well mixed and resembles wet sand. Press firmly and evenly into the bottom of the prepared pan. Bake for 10 minutes.
- Prepare the cheesecake filling: Beat softened cream cheese with sugar on medium speed until creamy and smooth, about 2-3 minutes. Scrape down the bowl as needed.
- Add eggs one at a time, beating well after each addition.
- Mix in vanilla extract and sour cream until just combined.
- Pour the cheesecake filling over the slightly cooled crust and smooth the top with a spatula.
- Bake for 35-40 minutes, until edges are set but center jiggles slightly.
- Cool completely on a wire rack for about 1 hour, then refrigerate for at least 4 hours or overnight.
- Arrange fresh blueberries in the top left corner to mimic stars, then create alternating rows of sliced strawberries and raspberries for stripes. Optionally brush berries with honey or sift powdered sugar over the top.
- Slice bars using a sharp knife dipped in hot water before each cut. Lift bars out using parchment overhang and serve chilled.
Notes
Soften cream cheese fully before mixing for smooth batter. Mix gently after adding eggs to avoid cracks. Use room temperature eggs. Bake until edges are set but center still jiggles slightly. Cool gradually before refrigerating. Use parchment paper for easy removal. Warm knife under hot water before slicing for clean cuts. Fresh berries are best for topping but thawed frozen berries can be used if drained well.
Nutrition
- Serving Size: 1 bar (1/16 of recip
- Calories: 210
- Sugar: 12
- Fat: 15
- Carbohydrates: 18
- Protein: 4
Keywords: cheesecake bars, berry cheesecake, patriotic dessert, 4th of July dessert, easy cheesecake, berry flag dessert