Love this? Save it for later!
Share the inspiration with your friends
Introduction
“I wasn’t planning on baking that afternoon,” I admit, “but then my neighbor, Mrs. Larkin, popped over with a cracked mixing bowl in one hand and a brown paper bag in the other.” She insisted that I try her “secret” recipe for peanut butter cookies, the kind with those iconic fork marks that always make them look like they’ve been kissed by tradition itself. Honestly, the afternoon quickly turned into a cozy kitchen mess, flour dust in the air and laughter echoing through the room.
Those cookies weren’t just good—they had that nostalgic pull, the one that transports you to simpler times when a sweet treat was the best kind of therapy. Maybe you’ve been there, standing by the oven, waiting for that golden edge to appear while the smell wraps around you like a warm hug. It’s funny how a simple fork press on a cookie can trigger such comfort.
Since that day, the classic homemade peanut butter cookies with fork marks have become my go-to for everything from last-minute gifts to midweek pick-me-ups. I keep coming back to this recipe because it’s honestly so forgiving and satisfying—plus, who doesn’t love that little crisscross pattern? Let me tell you, this isn’t just any peanut butter cookie recipe; it’s the one that sticks in your heart and crumb trails your kitchen counter.
Why You’ll Love This Recipe
After baking these peanut butter cookies countless times (including a few late-night cravings), I can confidently say this recipe is a winner for any kitchen. Here’s what makes it stand out:
- Quick & Easy: Ready in under 30 minutes, perfect for when you need a fast, satisfying snack.
- Simple Ingredients: No fancy or hard-to-find items—just pantry staples like peanut butter, sugar, and eggs.
- Perfect for Any Occasion: From casual gatherings to holiday cookie swaps, these cookies always make an impression.
- Crowd-Pleaser: Kids, adults, and even skeptics of peanut butter love these—trust me, I’ve had plenty of “seconds” requested.
- Unbelievably Delicious: The balance of sweet and salty, combined with a tender yet slightly chewy texture, makes these cookies so addictive.
What really sets this recipe apart is the technique behind those charming fork marks. Pressing the dough balls down with a fork isn’t just for looks—it helps the cookies bake evenly and creates that classic texture we all crave. Plus, I often swap in natural peanut butter or add a pinch of cinnamon for a subtle twist. Honestly, these cookies feel like a warm memory baked fresh every time.
What Ingredients You Will Need
This recipe calls for simple, wholesome ingredients that work together to create those classic peanut butter cookies you remember from childhood. Most of these are pantry staples, so there’s a good chance you have them on hand right now.
- Peanut Butter: 1 cup (smooth or chunky, depending on your preference). I usually go for a creamy, natural brand like Smucker’s Natural for the best flavor.
- Granulated Sugar: 1 cup (for that sweet crunch). You can swap half with brown sugar for a deeper, caramel-like note.
- Egg: 1 large, room temperature (helps bind everything together).
- Baking Soda: 1 teaspoon (provides just the right amount of lift).
- Vanilla Extract: 1 teaspoon (adds warmth and depth).
- Salt: ¼ teaspoon (balances sweetness and enhances peanut flavor).
Optional but recommended for a personal touch:
- Chocolate Chips or Chopped Nuts: ½ cup (adds texture and a flavor twist).
- Cinnamon: A pinch (a subtle warmth that complements peanut butter).
If you want a gluten-free version, this recipe is naturally gluten-free since it contains no flour, but make sure your baking soda is certified gluten-free. For a vegan twist, swap the egg with a flax egg (1 tablespoon ground flaxseed mixed with 3 tablespoons water, let sit 5 minutes).
Equipment Needed
- Mixing Bowl: A medium to large bowl to combine your ingredients. I like using a glass or stainless steel bowl because it’s easy to clean and doesn’t hold odors.
- Electric Mixer or Hand Whisk: While you can mix by hand, an electric mixer speeds things up and results in a creamier dough.
- Baking Sheet: A flat, rimmed cookie sheet works best for even baking.
- Parchment Paper or Silicone Baking Mat: Prevents sticking and makes cleanup a breeze.
- Fork: Essential for making the classic crisscross pattern on top of each cookie.
- Measuring Cups & Spoons: Precision is key for consistent results.
If you don’t have a mixer, no worries—just be prepared for a bit more muscle work when creaming the peanut butter and sugar. For budget-friendly baking, parchment paper is a great alternative to a silicone mat and reusable for several batches.
Preparation Method
- Preheat your oven to 350°F (175°C). Line a baking sheet with parchment paper or a silicone baking mat to prevent sticking and help with even baking. This step usually takes about 10 minutes if you’re multitasking.
- Mix the peanut butter and sugar. In your mixing bowl, combine 1 cup of peanut butter with 1 cup of granulated sugar. Use an electric mixer on medium speed or a sturdy spoon to cream them together until smooth and fluffy, about 2-3 minutes. This part is key for the right texture—don’t rush it.
- Add the egg and vanilla extract. Crack in one large egg and pour in 1 teaspoon vanilla extract. Beat everything together until fully incorporated, about 1 minute. If you skip this, the cookies can turn out dense.
- Stir in baking soda and salt. Add 1 teaspoon baking soda and ¼ teaspoon salt. Mix gently but thoroughly. These little ingredients help the cookies rise just right and enhance the peanut flavor. If you like, fold in chocolate chips or nuts at this point.
- Shape the dough into balls. Using a tablespoon or cookie scoop, portion out dough onto the prepared baking sheet about 2 inches apart. You should get around 20 cookies. Here’s a tip: if the dough feels sticky, chill it in the fridge for 10 minutes first.
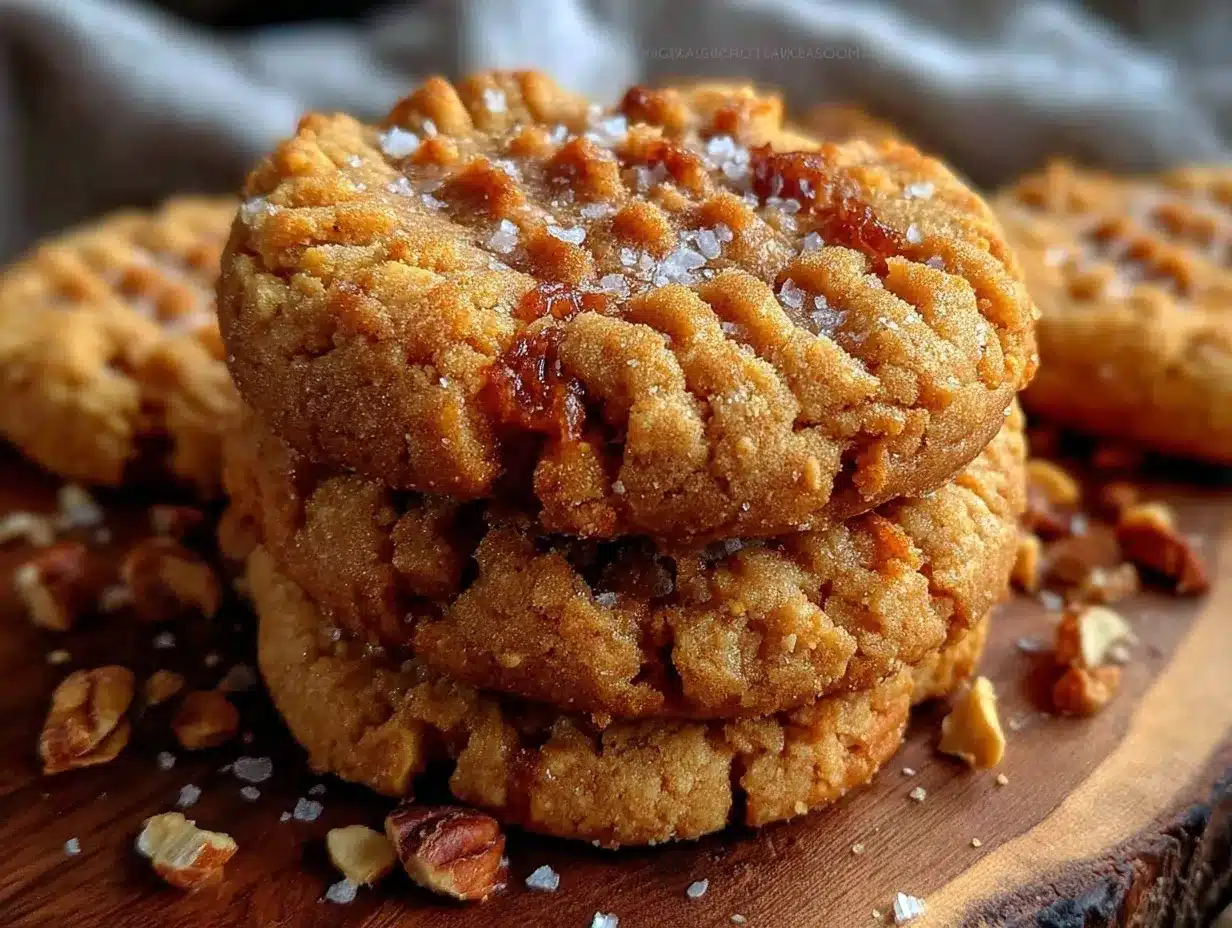
- Create the fork marks. Dip a fork in granulated sugar (to prevent sticking) and gently press down on each dough ball twice—once vertically, once horizontally—to form the iconic crisscross pattern. This step is not just decorative; it helps the cookies bake evenly and get that classic texture.
- Bake for 10-12 minutes. Keep a close eye; the edges should be just golden, while the centers stay soft. Overbaking can dry them out. You’ll smell that irresistible peanut butter aroma filling your kitchen!
- Cool on the baking sheet for 5 minutes. This helps the cookies set before transferring to a wire rack to cool completely. Trying to move them too soon might cause breakage.
One time, I forgot to press the fork marks before baking and ended up with perfectly round peanut butter blobs—still tasty, but missing that signature look! So, don’t skip the fork step, promise?
Cooking Tips & Techniques
Getting these peanut butter cookies just right can be easier than you think if you keep a few things in mind. First, always use fresh baking soda; it’s the unsung hero that gives these cookies their tender lift. I learned the hard way when a batch came out flat and brittle because I grabbed an old container.
When mixing, don’t overdo it—especially after adding the egg. Overmixing can make the cookies tough. The texture should be soft but pliable.
Pressing the fork marks while the dough is cold helps prevent sticking and gives cleaner lines. If your kitchen is warm, try chilling the dough for 15 minutes before shaping.
Timing is everything: start preheating your oven early, so it’s hot and ready when you’re done shaping. Multi-task by prepping your next batch while the first one bakes.
If you want evenly sized cookies, a cookie scoop is your best friend. It’s a small investment but makes a big difference in appearance and baking time.
Variations & Adaptations
While the classic version is fantastic, I love mixing things up depending on the season or mood. Here are a few ideas:
- Chocolate-Chocolate Chip: Add ½ cup semi-sweet chocolate chips and swap half the granulated sugar for brown sugar for a richer cookie.
- Gluten-Free: This recipe is naturally gluten-free, but double-check your baking soda and peanut butter labels to avoid hidden gluten.
- Spiced Twist: Add ½ teaspoon cinnamon and a pinch of nutmeg for a warm, cozy flavor perfect for fall.
- Vegan Version: Use a flax egg and a natural peanut butter that’s free of added dairy. The texture is slightly different but still delicious.
- Chunky Nut: Use chunky peanut butter and toss in chopped peanuts or walnuts for extra crunch.
Once, I tried adding a teaspoon of espresso powder, and wow—the peanut butter flavor popped even more! Feel free to experiment; this recipe is forgiving and fun.
Serving & Storage Suggestions
These classic homemade peanut butter cookies are best enjoyed at room temperature, where the texture is soft with just a hint of chewiness. Serve them alongside a cold glass of milk, a cup of coffee, or even a scoop of vanilla ice cream for an indulgent treat.
To store, place the cookies in an airtight container at room temperature for up to a week. If you want them softer, add a slice of bread to the container—it keeps moisture in and the cookies fresh longer.
For longer storage, freeze the baked cookies in a single layer on a baking sheet, then transfer to a freezer-safe bag or container. They keep well for up to 3 months. When ready, thaw at room temperature or warm briefly in the microwave for that fresh-baked feel.
Flavors actually develop and mellow if you let the cookies rest for a day, so if you can wait, it’s worth it.
Nutritional Information & Benefits
These peanut butter cookies provide a good source of protein and healthy fats thanks to the peanuts. Here’s a rough estimate per cookie (based on 20 cookies):
- Calories: 110-130
- Protein: 4 grams
- Fat: 8 grams (mostly heart-healthy monounsaturated fats)
- Carbohydrates: 10 grams
- Fiber: 1 gram
Because this recipe doesn’t use flour, it’s naturally gluten-free, which is helpful for those with sensitivities. Just watch out if you add chocolate chips or other mix-ins for potential allergens. Also, peanut allergies mean these cookies aren’t for everyone, so use caution.
From a wellness perspective, I appreciate that these cookies use minimal ingredients and no added preservatives. They feel like a treat that’s honest and satisfying, without overdoing it.
Conclusion
If you’re looking for a classic homemade peanut butter cookie recipe that’s simple, reliable, and full of that nostalgic charm, this one’s for you. The fork marks may seem like a small detail, but they bring character and a perfect texture that’s hard to beat.
Feel free to tweak the add-ins or try different peanut butters to make it your own. I love how this recipe invites creativity while staying true to that timeless cookie spirit.
Honestly, these cookies have been my sweet go-to for casual treats and special moments alike. I hope they find a spot in your kitchen and heart too. When you make them, I’d love to hear how you customize your batch or what memories they bring back—drop a comment below or share your story!
Happy baking, and may your kitchen always smell like fresh peanut butter cookies!
FAQs
- Can I use natural peanut butter in this recipe?
Yes! Natural peanut butter works well but might make the dough a bit softer, so chilling it before baking helps. - Why do we press the cookies with a fork?
The fork marks flatten the dough for even baking and create the classic crisscross pattern that helps identify peanut butter cookies. - How long do peanut butter cookies stay fresh?
Stored in an airtight container at room temperature, they stay fresh for up to a week. You can freeze them for longer storage. - Can I make these cookies gluten-free?
Absolutely! This recipe contains no flour, so it’s naturally gluten-free, but always verify your baking soda and peanut butter labels. - What can I substitute for the egg?
A flax egg (1 tbsp ground flaxseed + 3 tbsp water) works well for a vegan alternative.
For a different but equally comforting treat, you might enjoy my chewy oatmeal raisin cookies or the crowd-favorite crispy garlic chicken for dinner nights. Both are kitchen staples that bring joy and simplicity, just like these peanut butter cookies.
Pin This Recipe!

Classic Homemade Peanut Butter Cookies
A quick and easy recipe for classic peanut butter cookies with iconic fork marks, delivering a nostalgic, tender yet slightly chewy texture perfect for any occasion.
- Prep Time: 10 minutes
- Cook Time: 10-12 minutes
- Total Time: 22 minutes
- Yield: 20 cookies 1x
- Category: Dessert
- Cuisine: American
Ingredients
- 1 cup peanut butter (smooth or chunky)
- 1 cup granulated sugar
- 1 large egg, room temperature
- 1 teaspoon baking soda
- 1 teaspoon vanilla extract
- 1/4 teaspoon salt
- Optional: 1/2 cup chocolate chips or chopped nuts
- Optional: pinch of cinnamon
Instructions
- Preheat your oven to 350°F (175°C). Line a baking sheet with parchment paper or a silicone baking mat.
- In a mixing bowl, combine 1 cup peanut butter and 1 cup granulated sugar. Cream together using an electric mixer or sturdy spoon until smooth and fluffy, about 2-3 minutes.
- Add 1 large egg and 1 teaspoon vanilla extract. Beat until fully incorporated, about 1 minute.
- Stir in 1 teaspoon baking soda and 1/4 teaspoon salt. Fold in chocolate chips or nuts if using.
- Shape the dough into balls using a tablespoon or cookie scoop, placing them about 2 inches apart on the baking sheet (about 20 cookies). Chill dough for 10 minutes if sticky.
- Dip a fork in granulated sugar and press down on each dough ball twice (vertically and horizontally) to create crisscross fork marks.
- Bake for 10-12 minutes until edges are golden and centers are soft.
- Cool on the baking sheet for 5 minutes before transferring to a wire rack to cool completely.
Notes
Use fresh baking soda for best results. Chill dough if sticky for easier shaping and cleaner fork marks. Avoid overmixing after adding the egg to keep cookies tender. For vegan version, substitute egg with a flax egg (1 tbsp ground flaxseed + 3 tbsp water, let sit 5 minutes).
Nutrition
- Serving Size: 1 cookie
- Calories: 120
- Sugar: 7
- Sodium: 150
- Fat: 8
- Saturated Fat: 1.5
- Carbohydrates: 10
- Fiber: 1
- Protein: 4
Keywords: peanut butter cookies, classic cookies, fork mark cookies, easy cookies, homemade cookies, gluten-free cookies, vegan cookies option