Love this? Save it for later!
Share the inspiration with your friends
My three-year-old nephew stared at the plate with a furrowed brow, then looked up at me and asked if the cookie was going to gobble him. I laughed so hard I nearly dropped the tray, realizing he thought the brown, feathered shape was a real bird waiting for a snack. It was one of those moments that made all the flour dusting my kitchen floor worth it, honestly. He took a cautious bite, crunching into the golden-brown edge, and immediately declared it “yummy” before asking for another one right after. That specific reaction—the mix of curiosity and pure delight—is exactly why this recipe stuck with me.
We all know the stress of Thanksgiving dessert planning. You are juggling pumpkin pies, pecan tarts, and maybe a cranberry sauce that is just sitting there looking pretty. Adding another complex dessert can feel like too much work when you are already running around. That is why these easy Thanksgiving turkey sugar cookies have become my secret weapon. They are simple enough for a kid to help make, but they look impressive enough for any dinner party guest.
The dough is sweet and buttery, holding its shape perfectly so the turkey tail feathers stay distinct. I remember making these for a friend’s family gathering last year. The kids ran straight for the tray, ignoring the fancy cake entirely. It’s not just a cookie; it’s a little bit of holiday magic that takes the pressure off. You don’t need to be a professional baker to pull this off. Just some basic pantry staples and a little bit of patience.
I love that these cookies bring everyone together. There is something about shaping dough into animals that feels nostalgic and fun. It slows you down and lets you enjoy the process. Plus, the smell of vanilla and baked sugar fills the house, making everything feel cozy. My nephew’s question still makes me smile every time I bake these. It reminds me that food is about more than just taste; it’s about connection. And honestly, who doesn’t want a cookie that gets eaten with a giggle?
Why You’ll Love This Recipe
Let’s face it, holiday baking can be a lot of pressure. You want everything to look perfect, but you also need to keep it manageable. These turkey sugar cookies hit that sweet spot between impressive and incredibly easy. I have tested dozens of sugar cookie recipes over the years, from the thick rolled versions to the drop cookies, and this one stands out for its reliability. The dough is forgiving, meaning if you press a bit too hard with the cookie cutter, it doesn’t crack or fall apart. It’s sturdy enough to hold its shape but tender enough to melt in your mouth.
Here is why this recipe is a game-changer for your holiday table:
- Quick & Easy: The dough comes together in minutes, and you can bake a batch in under 15 minutes. This is perfect for busy weeknights or when you need a last-minute treat for a school party.
- Simple Ingredients: You likely already have everything you need in your kitchen. Flour, butter, sugar, eggs, and vanilla are all you need for the base. No fancy grocery trips required.
- Perfect for Family Activities: These are great for brunch, potlucks, or cozy dinners. They are also fantastic for getting kids involved in the kitchen. Shaping the feathers is a fun, low-stress activity that keeps little hands busy.
- Crowd-Pleaser: They always get rave reviews from kids and adults alike. The classic sugar cookie flavor is universally loved, and the turkey shape adds a festive touch that fits any Thanksgiving theme.
- Unbelievably Delicious: The texture is soft in the center with slightly crisp edges. The flavor combo is next-level comfort food, especially when paired with a warm drink.
What makes this recipe different from the rest is the balance of the dough. Many sugar cookie recipes can be too sweet or too cakey. This version uses a specific ratio of butter to sugar that creates a rich, melt-in-your-mouth texture without being heavy. I also add a touch of cornstarch to the flour, which tenderizes the crumb. It’s a small detail, but it makes a huge difference in the final bite.
This recipe isn’t just good—it is the kind that makes you close your eyes after the first bite. It’s comfort food reimagined—healthier in the sense that it’s simple and wholesome, but with the same soul-soothing satisfaction. It’s perfect for impressing guests without stress, or turning a simple meal into something memorable. You can make these ahead of time, which is a huge plus when you are hosting. Just store them in an airtight container, and they will stay fresh for days.
What Ingredients You Will Need
This recipe uses simple, wholesome ingredients to deliver bold flavor and satisfying texture without the fuss. The beauty of sugar cookies lies in the quality of the basics. You don’t need exotic spices or hard-to-find items. Everything here is likely already in your pantry or easy to grab from the local store. The key is using fresh ingredients, especially the butter and eggs, to ensure the dough has the best structure and flavor.
- All-Purpose Flour (2 1/4 cups): This is the backbone of the dough. It provides the structure. Make sure your flour is not packed down in the bag. Spoon it into the measuring cup and level it off for accuracy. I recommend using a brand like Gold Medal for consistent results.
- Unsalted Butter (1 cup, softened): Softened butter creamed with sugar creates air pockets, which helps the cookies rise slightly. If your butter is too cold, it won’t mix properly. If it is too melted, the cookies will spread too much. Room temperature is ideal.
- Granulated Sugar (1 cup): This adds sweetness and helps with the crisp edges. For a slightly softer cookie, you can substitute half with brown sugar, but the classic white sugar gives that traditional sugar cookie snap.
- Egg Yolks (2 large): Using only yolks adds richness and a tender crumb. The extra fat from the yolks makes the cookies more flavorful than using whole eggs. It also helps bind the dough without adding too much liquid.
- Vanilla Extract (1 tablespoon): A good quality vanilla extract is essential. It brings out the flavor of the butter and sugar. I prefer pure vanilla extract over imitation for a deeper, more authentic taste.
- Baking Powder (1 teaspoon) & Baking Soda (1/2 teaspoon): These leavening agents help the cookies spread and rise slightly. They ensure the cookies are not dense or hard. Make sure they are fresh for best results.
- Salt (1/2 teaspoon): Salt is crucial for balancing the sweetness. It enhances the other flavors and prevents the cookies from tasting flat.
- Food Coloring (Gel colors preferred): For the turkey body and feathers, gel food coloring is best. It provides vibrant colors without adding extra liquid to the dough. Liquid food coloring can make the dough runny, so stick to gels for the best results.
- Decorating Icing (Optional): You can use store-bought icing or make your own royal icing for detailing the eyes and beak. Royal icing holds its shape well and dries hard, making it perfect for fine details.
If you need to make substitutions, you can use gluten-free flour blend for a gluten-free option. Just make sure the blend includes xanthan gum for structure. You can also swap the butter for a dairy-free alternative if needed, though the texture might be slightly different. For the egg yolks, you can use flax eggs if you want a vegan option, but the cookies will be less rich.
Equipment Needed
To make these turkey cookies, you don’t need a lot of fancy gear. A few basic tools will get the job done perfectly. Having the right equipment makes the process smoother and ensures consistent results.
- Mixer: A stand mixer or hand mixer is helpful for creaming the butter and sugar. It saves time and effort. If you don’t have one, you can do it by hand with a wooden spoon, but it will take a bit more arm strength.
- Baking Sheets: Use standard half-sheet baking pans. Light-colored metal sheets are best because they reflect heat and prevent the bottoms from burning. Dark sheets absorb more heat, which can lead to over-browning.
- Parchment Paper: Lining your baking sheets with parchment paper prevents sticking and makes cleanup a breeze. It also helps the cookies bake evenly. You can also use silicone baking mats for a reusable option.
- Cookie Cutters: You will need a turkey-shaped cookie cutter. If you can’t find one, you can use a round cutter for the body and a small triangle for the tail, then assemble them. But a dedicated turkey cutter is definitely easier.
- Pastry Brush: A soft pastry brush is useful for applying an egg wash or milk to the cookies before baking. This helps the food coloring stick and gives the cookies a slight sheen.
- Airtight Container: Once the cookies are cooled, store them in an airtight container to keep them fresh. This is important for maintaining the texture and preventing them from going stale.
If you are on a budget, you don’t need to buy expensive tools. A simple wooden spoon and a basic set of cookie cutters will work fine. Just make sure your baking sheets are in good condition, without any dents or warps, to ensure even baking.
Preparation Method
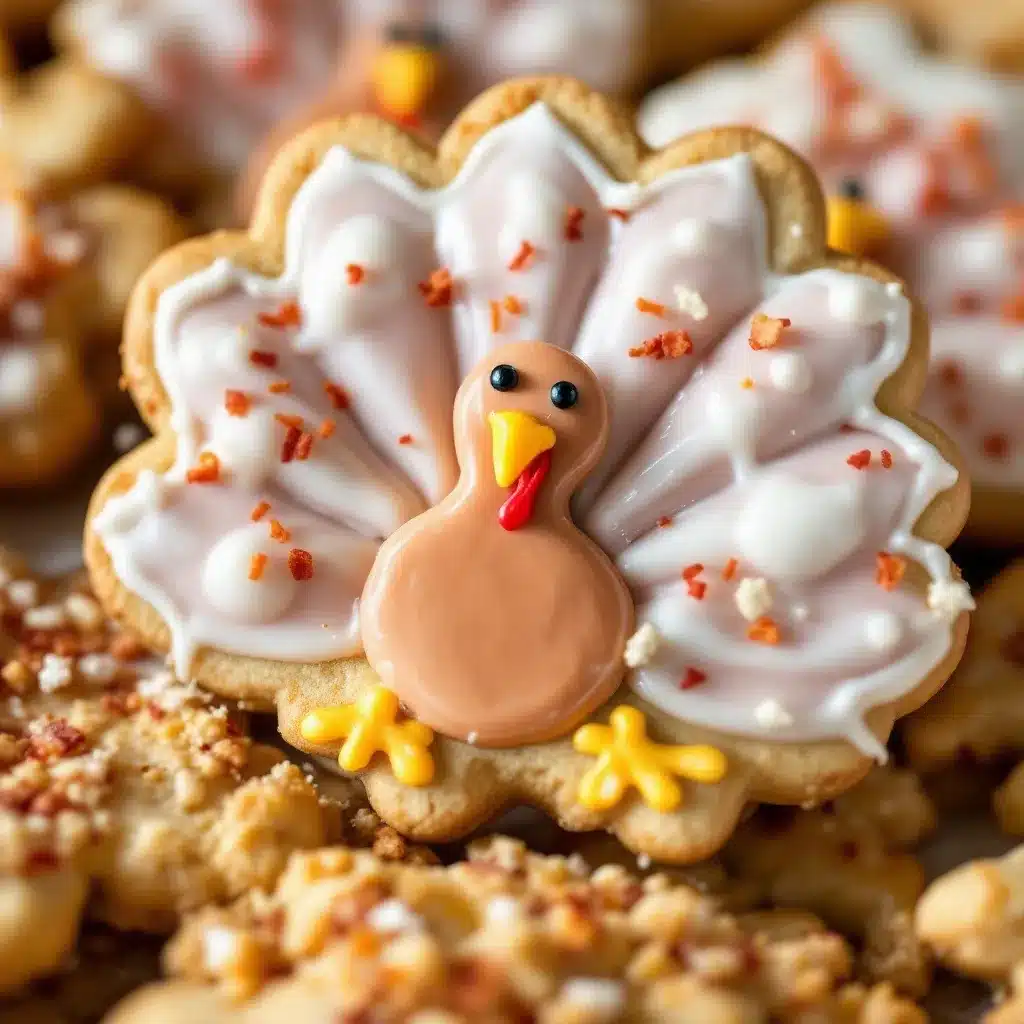
Making these cookies is straightforward, but attention to detail ensures they turn out perfect. Follow these steps carefully for the best results.
- Cream the Butter and Sugar: In a large bowl, beat the softened butter and granulated sugar together until light and fluffy. This should take about 3-4 minutes. If using a stand mixer, use the paddle attachment on medium speed. If mixing by hand, use a wooden spoon and put some effort into it. The mixture should pale in color and increase in volume. This step incorporates air, which helps the cookies rise.
- Add Egg Yolks and Vanilla: Add the egg yolks and vanilla extract to the butter mixture. Beat until fully combined. Scrape down the sides of the bowl with a spatula to ensure everything is mixed evenly. The mixture should look smooth and creamy.
- Mix Dry Ingredients: In a separate bowl, whisk together the flour, baking powder, baking soda, and salt. This ensures the leavening agents are evenly distributed. Sifting the flour is optional but can help remove lumps for a smoother dough.
- Combine Wet and Dry: Gradually add the dry ingredients to the wet mixture. Mix on low speed until just combined. Do not overmix, as this can make the cookies tough. The dough should come together in a ball. If it is too sticky, add a little more flour. If it is too dry, add a teaspoon of milk.
- Chill the Dough: Divide the dough into two portions. Flatten each into a disk and wrap in plastic wrap. Chill in the refrigerator for at least 1 hour. Chilling firm up the butter, which prevents the cookies from spreading too much in the oven. This step is crucial for maintaining the shape.
- Preheat Oven and Prepare Sheets: Preheat your oven to 350°F (175°C). Line your baking sheets with parchment paper. This ensures the cookies don’t stick and bake evenly.
- Roll and Cut: On a lightly floured surface, roll out one disk of dough to about 1/4 inch thickness. Use a turkey-shaped cookie cutter to cut out shapes. Press firmly and lift straight up. Place the cutouts on the baking sheets, leaving about 1 inch between them for spreading. Re-roll the scraps to cut more cookies.
- Add Color: If you want colored feathers, you can tint small portions of the dough with gel food coloring before rolling. Or, you can paint the feathers with food coloring mixed with a little vodka or lemon extract after baking. The alcohol evaporates quickly, leaving the color behind.
- Bake: Bake the cookies for 10-12 minutes, or until the edges are lightly golden. Do not overbake, as they will continue to cook on the hot pan. The centers should still look slightly soft.
- Cool: Let the cookies cool on the baking sheet for 5 minutes before transferring them to a wire rack. This allows them to set and become firm enough to handle. Cool completely before decorating or storing.
Cooking Tips & Techniques
Baking cookies might seem simple, but there are a few tricks to ensure they come out perfect every time. I have made my fair share of burnt or flat cookies, so I learned these lessons the hard way.
- Butter Temperature is Key: Your butter should be soft but not melted. If it is too warm, the cookies will spread too much. If it is too cold, it won’t cream properly. A good test is to press your finger into the butter; it should leave an indent without sinking all the way in.
- Don’t Overmix the Dough: Once you add the flour, mix just until combined. Overmixing develops gluten, which makes the cookies tough and chewy instead of tender and crumbly. Stop mixing as soon as you no longer see streaks of flour.
- Chill the Dough: This is the most important step. Chilling the dough firms up the butter, which prevents spreading. It also allows the flavors to meld together, resulting in a richer taste. If you skip this step, your turkey shapes might lose their definition.
- Use Gel Food Coloring: Gel food coloring is more concentrated than liquid coloring, so you don’t need to add as much. This keeps the dough’s consistency intact. Liquid coloring can make the dough wet and sticky, which is hard to work with.
- Watch the Oven: Ovens can vary in temperature. Use an oven thermometer to check your actual temperature. Keep an eye on the cookies during the last few minutes of baking. They are done when the edges are just starting to turn golden.
- Cool Completely: Resist the urge to decorate warm cookies. The icing will melt and slide off. Let them cool completely on a wire rack to ensure a smooth surface for decorating.
I once baked a batch of cookies without chilling the dough, and they turned into flat circles. It was a disaster. Since then, I always chill my dough. It’s a small step that makes a big difference. Also, don’t crowd the baking sheets. Give the cookies space to spread slightly. If they are too close, they will merge together.
Variations & Adaptations
These cookies are versatile and can be adapted to fit different tastes and dietary needs. Here are a few ideas to customize them.
- Gluten-Free Option: Use a 1-to-1 gluten-free flour blend. Make sure the blend includes xanthan gum for structure. The texture might be slightly more crumbly, but it will still be delicious.
- Dairy-Free: Substitute the butter with a high-quality vegan butter stick. Ensure the vegan butter has a similar fat content to dairy butter for best results. You can also use coconut oil, but it will impart a slight coconut flavor.
- Vegan Option: Use flax eggs instead of egg yolks. Mix 1 tablespoon of ground flaxseed with 3 tablespoons of water and let it sit for 5 minutes until gelatinous. This will bind the dough, though the texture will be less rich.
- Flavor Variations: Add a teaspoon of almond extract instead of vanilla for a nutty flavor. Or, mix in some orange zest for a citrusy twist. The orange and vanilla combination is classic and festive.
- Decorating Ideas: Instead of food coloring, you can dip the baked cookies in melted chocolate. Dip half in white chocolate and half in dark chocolate for a two-toned effect. You can also use sprinkles or edible glitter for extra sparkle.
I tried making these with almond extract once, and they were amazing. The nutty flavor paired well with the festive shape. It’s a nice change from the traditional vanilla. You can also add a pinch of cinnamon to the dough for a spiced sugar cookie vibe. It’s a great option for fall.
Serving & Storage Suggestions
These cookies are best served at room temperature. They pair well with a cup of hot cocoa or coffee. The warmth of the drink complements the sweet, buttery flavor of the cookies.
- Serving: Arrange the cookies on a platter with a festive napkin. You can stack them slightly for a casual look. Add some pine sprigs or autumn leaves as garnish for a seasonal touch.
- Storage: Store the cookies in an airtight container at room temperature for up to 5 days. Place a piece of bread in the container to keep them soft. The bread will release moisture, which the cookies will absorb.
- Freezing: You can freeze the baked cookies for up to 3 months. Place them in a single layer in a freezer-safe container, separated by parchment paper. Thaw at room temperature before serving. You can also freeze the dough balls. Just thaw in the fridge overnight and bake as usual.
- Reheating: If you want warm cookies, microwave them for 10-15 seconds. They will be soft and gooey. Be careful not to overheat, as they can become hard.
The flavors develop over time, so they often taste better the next day. The butter and sugar meld together, creating a deeper, more complex flavor. I usually make these a day or two before Thanksgiving to save time. They keep well and are ready to serve when the guests arrive.
Nutritional Information & Benefits
These cookies are a treat, but they can fit into a balanced diet in moderation. Here is an estimated nutritional breakdown per cookie (assuming 24 cookies):
- Calories: Approximately 120 calories
- Fat: 6g
- Carbohydrates: 15g
- Protein: 2g
- Sugar: 8g
The main ingredients are flour and sugar, which provide carbohydrates for energy. The butter adds fat, which helps with satiety. The egg yolks provide protein and vitamins. While these cookies are not a health food, they are made with simple ingredients. You can reduce the sugar slightly if you prefer less sweetness, though it may affect the texture.
For those with dietary restrictions, the gluten-free and vegan adaptations make these cookies accessible to more people. It’s important to enjoy treats in balance with nutritious meals. These cookies are a fun way to add a little sweetness to your holiday celebrations.
Conclusion
These easiest Thanksgiving turkey sugar cookies are a delightful addition to any holiday table. They are simple to make, delicious to eat, and fun to share. I hope you enjoy making them as much as I do. The joy on a child’s face when they see a cookie shaped like a turkey is priceless. It creates memories that last long after the crumbs are gone.
Feel free to customize the recipe to suit your preferences. Add your favorite spices, change the decorations, or experiment with different flavors. The possibilities are endless. I would love to hear how you make these cookies your own. Please share your creations in the comments below or tag me on social media. Your feedback helps me improve and inspire others.
Thank you for trying this recipe. Happy baking, and enjoy the holidays with your loved ones.
FAQs
Can I make the dough ahead of time?
Yes, you can make the dough up to 3 days in advance. Store it in the refrigerator in an airtight container or wrapped in plastic wrap. Let it come to room temperature before rolling and cutting.
Why did my cookies spread too much?
This usually happens if the butter was too warm or if the dough was not chilled enough. Make sure your butter is softened but not melted, and chill the dough for at least 1 hour before baking.
Can I use liquid food coloring?
It is not recommended. Liquid food coloring adds extra moisture to the dough, which can make it sticky and hard to work with. Gel food coloring is more concentrated and does not alter the dough’s consistency.
How do I store the decorated cookies?
Store the decorated cookies in an airtight container at room temperature. Place layers of parchment paper between the cookies to prevent the icing from sticking. They will stay fresh for up to 5 days.
Can I freeze the unbaked cookies?
Yes, you can freeze the cut-out cookies on a baking sheet until they are solid, then transfer them to a freezer bag. Bake them straight from the freezer, adding 1-2 minutes to the baking time.
Pin This Recipe!

Easiest Thanksgiving Turkey Sugar Cookies: 5-Min Easy Holiday Cookies
Simple, buttery sugar cookies shaped like turkeys that are perfect for Thanksgiving. They are easy to make, kid-friendly, and require only basic pantry staples.
- Prep Time: 15 minutes
- Cook Time: 12 minutes
- Total Time: 27 minutes
- Yield: 24 cookies 1x
- Category: Dessert
- Cuisine: American
Ingredients
- 2 1/4 cups All-Purpose Flour
- 1 cup Unsalted Butter (softened)
- 1 cup Granulated Sugar
- 2 large Egg Yolks
- 1 tablespoon Vanilla Extract
- 1 teaspoon Baking Powder
- 1/2 teaspoon Baking Soda
- 1/2 teaspoon Salt
- Gel Food Coloring (for decorating)
- Decorating Icing or Royal Icing (optional)
Instructions
- Cream the softened butter and granulated sugar together in a large bowl until light and fluffy (about 3-4 minutes).
- Add the egg yolks and vanilla extract to the butter mixture and beat until fully combined.
- In a separate bowl, whisk together the flour, baking powder, baking soda, and salt.
- Gradually add the dry ingredients to the wet mixture, mixing on low speed until just combined. Do not overmix.
- Divide the dough into two portions, flatten into disks, wrap in plastic wrap, and chill in the refrigerator for at least 1 hour.
- Preheat oven to 350°F (175°C) and line baking sheets with parchment paper.
- Roll out one disk of dough to about 1/4 inch thickness on a lightly floured surface.
- Use a turkey-shaped cookie cutter to cut out shapes and place them on baking sheets, leaving 1 inch between them.
- Add color to the feathers using gel food coloring if desired.
- Bake for 10-12 minutes or until edges are lightly golden.
- Let cookies cool on the baking sheet for 5 minutes before transferring to a wire rack to cool completely.
Notes
Ensure butter is softened but not melted. Chill dough thoroughly to prevent spreading. Use gel food coloring instead of liquid to maintain dough consistency. Cookies can be stored in an airtight container with a piece of bread to keep them soft.
Nutrition
- Serving Size: 1 cookie
- Calories: 120
- Sugar: 8
- Sodium: 100
- Fat: 6
- Saturated Fat: 3
- Carbohydrates: 15
- Protein: 2
Keywords: Thanksgiving cookies, turkey sugar cookies, holiday baking, easy cookies, kid-friendly recipes, Thanksgiving dessert