Love this? Save it for later!
Share the inspiration with your friends
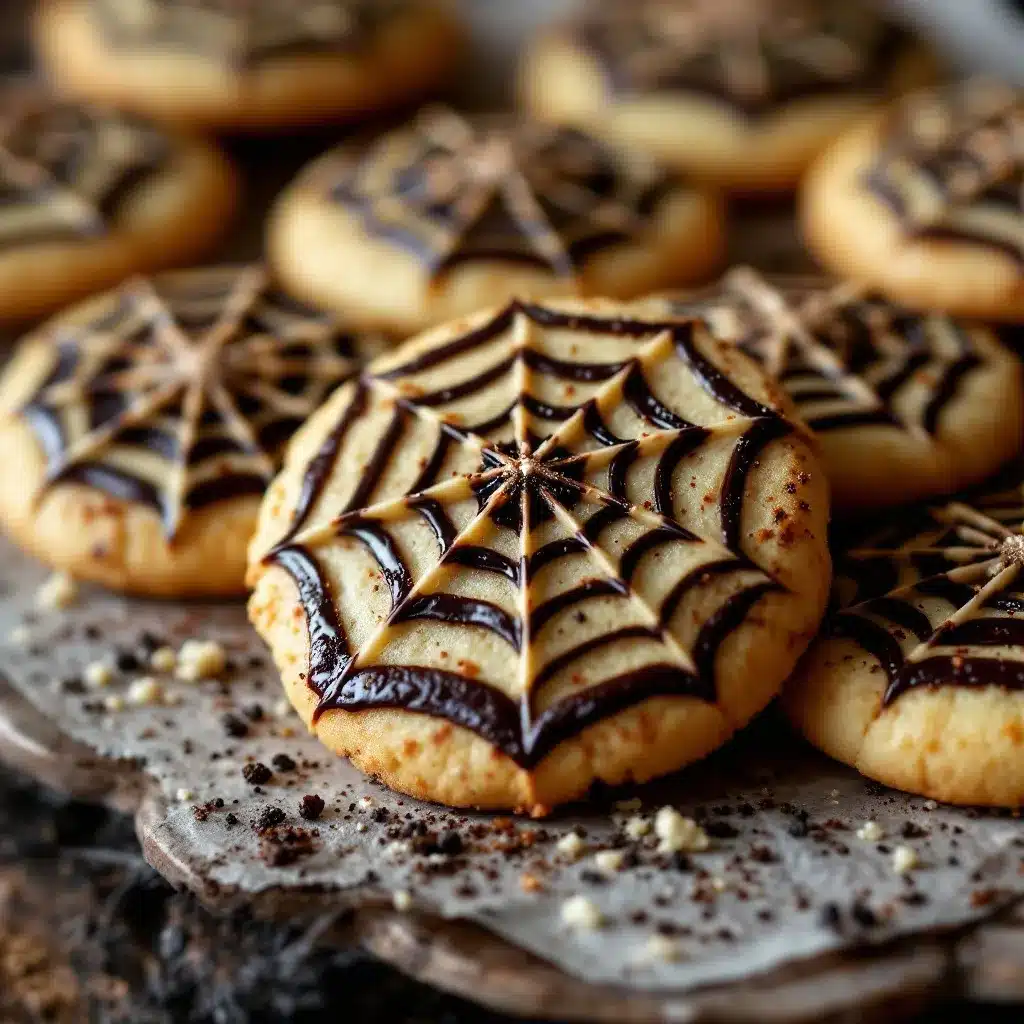
The fourth time I made spiderweb sugar cookies in a single week, I finally stopped overthinking the icing. That was the batch where I stopped trying to make perfect concentric circles and just let the toothpick do what it wanted. And honestly? That batch looked more like actual spiderwebs than any of the careful ones. There is something deeply satisfying about a cookie that looks better when you stop being precious with it. These spooky spiderweb sugar cookies have that energy. They look like you spent hours piping intricate webs, but the secret is a quick dragging motion with a toothpick. It is the kind of Halloween baking trick that makes you feel like a kitchen wizard, even when you are just making cookies in your sweatpants.
I have made a lot of decorated cookies over the years. Some turned out beautiful and took forever. Others were rushed and still looked great. These spiderweb cookies fall firmly into the latter category, which is probably why I kept making them. The dough comes together fast, the icing sets up just right, and the web pattern forgives every shaky hand and impatient pull. By that fourth batch, I had figured out that the icing consistency matters more than any other detail—too thick and the web drags clumps instead of lines, too thin and it all bleeds together into a sticky mess. But once you hit that sweet spot? Magic.
I am not going to pretend these cookies changed my life. But they did change how I think about Halloween baking. It stopped being about impressing anyone and started being about that small thrill of dragging a toothpick through icing and watching a web appear. Every single time, it feels like a tiny trick. And the treat is pretty good, too.
Why You Will Love This Recipe
Let me tell you why these spooky spiderweb sugar cookies keep showing up in my kitchen every October. First, they are genuinely easy. I have tested this recipe with beginner bakers and experienced cookie decorators, and everyone gets the same result—cookies that look like they belong on a bakery shelf. The dough does not spread weirdly in the oven, the icing sets firm enough to stack, and the web pattern hides any imperfections. That is a win in my book.
- Quick and Easy: From start to finish, you can have decorated cookies in under two hours. That includes chilling time. The active work is maybe 30 minutes.
- Simple Ingredients: Butter, sugar, flour, egg, vanilla, and a few pantry staples. No specialty extracts or hard-to-find decorations.
- Perfect for Halloween: These cookies steal the show at parties, trick-or-treat gatherings, or just a cozy night in with a scary movie.
- Crowd-Pleaser: Kids love decorating them. Adults love eating them. Everyone loves the spooky factor.
- Unbelievably Delicious: The cookie itself is a classic sugar cookie—soft in the middle, slightly crisp at the edges, with a buttery vanilla flavor that pairs perfectly with the sweet icing.
What makes this recipe different from other decorated cookies I have tried? The icing technique. Most spiderweb tutorials use royal icing, which requires precise piping and dries rock hard. My version uses a simple powdered sugar glaze that stays soft and silky. It tastes better, spreads easier, and the web pattern comes out cleaner. Plus, you do not need a piping bag. Just a toothpick. That is the kind of low-stakes baking I can get behind.
These cookies are the kind that makes you close your eyes after the first bite. Not because they are fancy, but because they taste like childhood Halloween—sweet, buttery, and just a little bit spooky.
What Ingredients You Will Need
This recipe uses simple, wholesome ingredients to deliver a soft, buttery sugar cookie that holds its shape and a glossy icing that sets perfectly for decorating. Most of these are pantry staples, so you probably already have everything you need.
For the Cookies
- 1 cup (226g) unsalted butter, softened – I use Land O Lakes for consistent results. Make sure it is truly softened, not melted. Softened butter creeps into the sugar better and gives a tender crumb.
- 1 cup (200g) granulated sugar – Regular white sugar. Do not substitute with brown sugar; it changes the spread and flavor.
- 1 large egg, room temperature – Cold egg will seize the butter mixture. Let it sit out for 30 minutes or place it in warm water for 5 minutes.
- 2 teaspoons vanilla extract – Pure vanilla extract, not imitation. It makes a noticeable difference in flavor.
- 3 cups (360g) all-purpose flour – Spoon and level your flour. Scooping directly from the bag packs in too much flour and makes dry cookies.
- 1 teaspoon baking powder – Helps the cookies puff slightly without spreading too much.
- ½ teaspoon salt – Balances the sweetness and enhances the butter flavor.
For the Icing
- 2 cups (240g) powdered sugar – Sift it if it is lumpy. Lumpy powdered sugar makes lumpy icing.
- 3-4 tablespoons milk – Whole milk works best, but 2% or dairy-free milk also works. Add slowly to control consistency.
- 1 teaspoon vanilla extract – Keeps the icing flavor consistent with the cookie.
- Black gel food coloring – I recommend Americolor Super Black. Liquid food coloring thins the icing too much and gives a washed-out gray.
Substitution Notes
If you need a dairy-free option, use vegan butter sticks and dairy-free milk. The texture will be slightly different but still delicious. For a gluten-free version, swap the all-purpose flour with a 1:1 gluten-free baking blend that contains xanthan gum. I have tested this with King Arthur Measure for Measure, and it works well. Just note that gluten-free dough tends to be more fragile, so handle it gently.
For the icing, you can use lemon juice instead of milk for a tangy twist. It pairs surprisingly well with the sweet cookie. If you do not have black gel food coloring, you can leave the icing white and draw the webs with dark chocolate. It gives a different look but still reads as spooky.
Equipment Needed
You do not need a fancy kitchen to make these spooky spiderweb sugar cookies. Here is what you will need:
- Stand mixer or hand mixer – A stand mixer makes creaming butter and sugar effortless, but a hand mixer works just fine. I have made these cookies with both.
- Large mixing bowls – One for the dough, one for the icing.
- Rolling pin – I prefer a French rolling pin without handles for better control. If you do not have one, a wine bottle works in a pinch.
- Round cookie cutter – 3-inch diameter is ideal. You can use a drinking glass if you do not have a cutter.
- Baking sheets – Light-colored aluminum sheets give the most even browning. Dark sheets can over-brown the bottoms.
- Parchment paper or silicone baking mat – Prevents sticking and makes cleanup easy.
- Wire cooling rack – Essential for cooling cookies evenly before icing.
- Toothpicks – The star of the show. You will use these to create the spiderweb pattern.
- Small piping bag or zip-top bag – For piping the icing circles. A zip-top bag with a tiny corner snipped off works perfectly.
If you are just starting out, do not stress about having everything. I have made these cookies with a fork instead of a mixer and a butter knife instead of a rolling pin. The cookies still turned out great. But if you bake often, investing in a good rolling pin and a set of round cutters is worth it. I have had my current rolling pin for eight years, and it still works like new.
Preparation Method
Let me walk you through this step by step. I have included every detail I wish someone had told me the first time I made these.
Make the Cookie Dough
- Cream the butter and sugar. In a large mixing bowl, beat the softened butter and granulated sugar together on medium speed until light and fluffy, about 3 minutes. Scrape down the sides of the bowl halfway through. You want the mixture to look pale and airy. This step is important for a tender cookie.
- Add the egg and vanilla. Beat in the room-temperature egg and vanilla extract until fully combined, about 30 seconds. The mixture might look slightly curdled at this point. Do not panic. That is normal.
- Mix the dry ingredients. In a separate bowl, whisk together the flour, baking powder, and salt. Add the dry ingredients to the wet mixture in two additions, mixing on low speed after each addition until just combined. Overmixing at this stage develops gluten and makes tough cookies. Stop as soon as you no longer see streaks of flour.
- Chill the dough. Turn the dough out onto a piece of plastic wrap, flatten it into a disk about 1 inch thick, and wrap it tightly. Refrigerate for at least 30 minutes, or up to 3 days. Chilling is non-negotiable. It prevents the cookies from spreading into shapeless blobs in the oven.
Roll and Cut the Cookies
- Preheat the oven to 350°F (175°C). Line two baking sheets with parchment paper or silicone mats.
- Roll out the dough. Lightly flour your work surface and rolling pin. Roll the chilled dough to ¼-inch thickness. Check for even thickness by running your fingers along the edges. If the dough feels thicker in some spots, keep rolling. Uneven cookies bake unevenly.
- Cut out the cookies. Use a 3-inch round cookie cutter to cut out as many cookies as possible. Press straight down without twisting the cutter. Twisting seals the edges and prevents the cookies from rising evenly. Transfer the cut cookies to the prepared baking sheets, spacing them about 2 inches apart.
- Bake for 9-11 minutes, or until the edges are just barely golden. The centers should look set but not brown. I usually pull them at the 10-minute mark. Let the cookies cool on the baking sheet for 5 minutes, then transfer to a wire rack to cool completely. Do not skip this resting step. The cookies continue to set as they cool.
Make and Apply the Icing
- Prepare the icing. In a medium bowl, whisk together the powdered sugar, 3 tablespoons of milk, and vanilla extract until smooth. The icing should be thick but flow slowly from the whisk. If it is too thick, add the remaining tablespoon of milk. If it is too thin, add more powdered sugar, one tablespoon at a time.
- Color the icing. Divide the icing into two portions—about ¾ white and ¼ for black. Add black gel food coloring to the smaller portion until you reach your desired darkness. Start with a tiny dab; gel colors are concentrated. Stir thoroughly to avoid streaks.
- Pipe the base layer. Spoon the white icing into a small piping bag or zip-top bag with a tiny corner snipped off. Pipe a thin outline around the edge of each cooled cookie, then fill in the center with more icing. Use the back of a spoon or a small offset spatula to spread it evenly. Let the base layer set for about 10 minutes. It should be slightly tacky but not wet.
- Create the spiderweb. Using the black icing, pipe 3-4 concentric circles on top of the white icing. Work quickly before the base layer dries completely. Then, drag a toothpick from the center of the cookie outward through all the circles, like drawing spokes on a wheel. Repeat this 6-8 times around the cookie. The toothpick pulls the black icing through the white, creating a web pattern. Wipe the toothpick clean between each drag for the cleanest lines.
- Let the icing set. Allow the decorated cookies to sit at room temperature for at least 1 hour, or until the icing is firm to the touch. If you are stacking them, wait a full 2 hours.
Cooking Tips and Techniques
I have made enough mistakes with these cookies to fill a small notebook. Here are the lessons that actually stuck.
Do not skip the chill. I know it is tempting to rush, but warm dough spreads. Really spreads. I once skipped the chill because I was in a hurry, and my cookies turned into flat, sad discs that looked nothing like spiderwebs. The 30-minute chill is not optional—it is structural.
Icing consistency is everything. If your white icing is too thick, the black icing will sit on top instead of sinking in, and the web pattern will look clumpy. If it is too thin, the black icing will bleed into a gray mess. Aim for the consistency of honey—thick but pourable. Test it on a scrap cookie first. If the toothpick drags clean lines without tearing the icing, you are golden.
Work in batches. Only ice 3-4 cookies at a time. The white base layer needs to be slightly tacky for the web technique to work. If you ice all 24 cookies at once, the base will be too dry by the time you get to the last one. I learned this the hard way during my second batch. Now I ice in small groups, and every web turns out crisp.
Use a light hand with the toothpick. You do not need to press hard. A gentle drag is enough to pull the black icing through the white. Pressing too hard can tear the icing and leave bare cookie showing through. Think of it as drawing, not digging.
Clean your toothpick often. After every 2-3 drags, wipe the toothpick on a paper towel. Residual icing buildup will make messy lines. I keep a stack of toothpicks and a damp cloth nearby so I can swap them out quickly.
Variations and Adaptations
One of the best things about these spooky spiderweb sugar cookies is how easy they are to adapt. Here are some variations I have tried and loved.
Chocolate Spiderwebs: Swap ¼ cup of the all-purpose flour with ¼ cup of unsweetened cocoa powder. The chocolate flavor pairs beautifully with the vanilla icing, and the dark cookie base makes the white webs pop even more. I made these for a Halloween party last year, and they disappeared first.
Gluten-Free Version: As I mentioned earlier, a 1:1 gluten-free flour blend works well. I have tested this with Bob Red Mill and King Arthur. The dough is a bit more delicate, so I recommend rolling it between two sheets of parchment paper to prevent sticking. The icing stays the same.
Vegan Adaptation: Use vegan butter sticks and a flax egg (1 tablespoon ground flaxseed mixed with 3 tablespoons water, left to sit for 5 minutes). The cookies will be slightly less tender but still delicious. Use dairy-free milk in the icing.
Spiced Version: Add 1 teaspoon of cinnamon and ½ teaspoon of nutmeg to the dry ingredients. The warm spices give the cookies a cozy fall flavor that works surprisingly well with the spooky theme. I like to pair these with a cup of warm vanilla milk with cinnamon and honey for a Halloween night treat.
Different Web Colors: Instead of black, use purple, orange, or green gel food coloring. You can also leave the base layer white and pipe the webs in black for a classic look. For a more dramatic effect, use a dark chocolate ganache instead of black icing. It is richer and gives a sophisticated twist.
Serving and Storage Suggestions
These cookies are best enjoyed at room temperature, about 30 minutes after the icing has set. The cookie should be soft and buttery, with the icing slightly firm but still tender. I like to serve them on a black platter or a wooden board with some fake spiderwebs and plastic spiders scattered around. It makes the whole presentation feel festive without much effort.
For drinks, these cookies pair beautifully with a glass of cold milk, a warm cup of coffee, or a spiced apple cider. If you are hosting a Halloween party, set up a cookie decorating station with extra icing and toothpicks. It is a fun activity for kids and adults alike.
Storage: Store undecorated cookies in an airtight container at room temperature for up to 1 week. Decorated cookies should be stored in a single layer, or with parchment paper between layers, to prevent the icing from smudging. They will stay fresh for up to 5 days. Do not refrigerate them; the fridge dries out the cookies and makes the icing crack.
Freezing: You can freeze the unbaked cookie dough for up to 3 months. Wrap the disk tightly in plastic wrap and then foil. When ready to bake, thaw the dough in the refrigerator overnight, then roll, cut, and bake as directed. Baked undecorated cookies also freeze well for up to 2 months. Thaw at room temperature before icing.
One thing I have noticed is that the flavors actually improve after a day. The vanilla mellows out, and the cookie becomes even softer. So if you can wait, bake these a day ahead. Your future self will thank you.
Nutritional Information and Benefits
Let me be honest—these are not health cookies. They are a treat, and they should be enjoyed as such. But here is the estimated nutritional breakdown per cookie (based on 24 cookies):
- Calories: 185
- Total Fat: 8g
- Saturated Fat: 5g
- Carbohydrates: 27g
- Sugar: 16g
- Protein: 2g
The butter provides a small amount of vitamin A, and the eggs add protein and B vitamins. If you use real vanilla extract, you get trace amounts of antioxidants. But honestly, the main benefit here is joy. Baking these cookies is a fun activity that brings people together. Decorating them is a creative outlet. Eating them is pure comfort.
For dietary considerations, these cookies contain gluten, dairy, and eggs. The gluten-free and vegan variations I mentioned earlier address those needs. If you are watching your sugar intake, you can reduce the sugar in the cookie dough to ¾ cup, but the texture will be slightly less tender. The icing needs the full amount of powdered sugar for the right consistency.
Conclusion
These spooky spiderweb sugar cookies are everything I want in a Halloween recipe—easy, impressive, and genuinely fun to make. They do not require fancy skills or expensive equipment. Just butter, sugar, flour, and a toothpick. That is it. And yet, every time I pull a tray out of the oven and start piping those webs, I feel like a kid again. There is something magical about watching a simple drag of a toothpick transform a plain cookie into something that looks like it crawled out of a haunted house.
I hope you give these a try. And when you do, do not stress about perfection. The webs do not have to be symmetrical. The icing does not have to be flawless. Some of my best batches were the messiest ones. That is the beauty of Halloween baking—it is supposed to be a little spooky, a little imperfect, and a lot of fun.
If you make these, I would love to hear about it. Leave a comment below and tell me how your webs turned out. Did you try any variations? Did your kids take over the decorating? Share your photos, your stories, and your own tips. And if you are looking for more Halloween baking ideas, check out this classic peanut butter cookie recipe or these German spice cookies for another cozy treat. Happy Halloween, and happy baking!
Frequently Asked Questions
Can I make the dough ahead of time?
Absolutely. The dough can be refrigerated for up to 3 days or frozen for up to 3 months. Just wrap it tightly in plastic wrap and then foil. When you are ready to bake, let the dough sit at room temperature for about 10 minutes before rolling. It will be easier to work with if it is not rock hard.
Why did my cookies spread too much?
This usually happens for one of three reasons: the dough was not chilled long enough, the butter was too soft, or the baking sheet was too warm. Make sure your butter is softened but not melted, chill the dough for at least 30 minutes, and always use cool baking sheets. If you are baking multiple batches, let the sheet cool completely between batches.
Can I use royal icing instead of the glaze?
Yes, you can. Royal icing dries harder and gives a more matte finish. However, the spiderweb technique works slightly differently with royal icing because it sets faster. You will need to work quickly and pipe the webs immediately after flooding the base. I personally prefer the glaze because it tastes better and stays softer, but royal icing is a great option if you need the cookies to stack or ship.
How do I get the black icing really dark?
Use black gel food coloring, not liquid. Start with a small amount and add more until you reach the desired shade. If the icing starts to thin out from too much coloring, add a little more powdered sugar to thicken it back up. You can also let the black icing sit for 10-15 minutes after coloring; the color deepens as it rests.
Can I use a different cookie cutter shape?
Of course! While round cookies give the classic spiderweb look, you can use any shape you like. Pumpkin, ghost, and bat cutters work especially well. Just adjust the baking time slightly if the cookies are much larger or smaller than 3 inches. Thinner cookies bake faster, thicker cookies take longer. Keep an eye on the edges for that golden-brown cue.
Pin This Recipe!

Easy Spiderweb Sugar Cookies: Best Halloween Recipe

These spooky spiderweb sugar cookies look like you spent hours piping intricate webs, but the secret is a quick dragging motion with a toothpick. They are easy, impressive, and genuinely fun to make.
- Prep Time: 30 minutes
- Cook Time: 10 minutes
- Total Time: 1 hour 40 minutes (including chilling and setting)
- Yield: 24 servings 1x
- Category: Dessert
- Cuisine: American
Ingredients
- 1 cup (226g) unsalted butter, softened
- 1 cup (200g) granulated sugar
- 1 large egg, room temperature
- 2 teaspoons vanilla extract
- 3 cups (360g) all-purpose flour
- 1 teaspoon baking powder
- ½ teaspoon salt
- 2 cups (240g) powdered sugar
- 3–4 tablespoons milk
- 1 teaspoon vanilla extract
- Black gel food coloring
Instructions
- Cream the butter and sugar: In a large mixing bowl, beat the softened butter and granulated sugar together on medium speed until light and fluffy, about 3 minutes. Scrape down the sides of the bowl halfway through.
- Add the egg and vanilla: Beat in the room-temperature egg and vanilla extract until fully combined, about 30 seconds.
- Mix the dry ingredients: In a separate bowl, whisk together the flour, baking powder, and salt. Add the dry ingredients to the wet mixture in two additions, mixing on low speed after each addition until just combined.
- Chill the dough: Turn the dough out onto a piece of plastic wrap, flatten it into a disk about 1 inch thick, and wrap it tightly. Refrigerate for at least 30 minutes, or up to 3 days.
- Preheat the oven to 350°F (175°C). Line two baking sheets with parchment paper or silicone mats.
- Roll out the dough: Lightly flour your work surface and rolling pin. Roll the chilled dough to ¼-inch thickness.
- Cut out the cookies: Use a 3-inch round cookie cutter to cut out as many cookies as possible. Press straight down without twisting the cutter. Transfer the cut cookies to the prepared baking sheets, spacing them about 2 inches apart.
- Bake for 9-11 minutes, or until the edges are just barely golden. Let the cookies cool on the baking sheet for 5 minutes, then transfer to a wire rack to cool completely.
- Prepare the icing: In a medium bowl, whisk together the powdered sugar, 3 tablespoons of milk, and vanilla extract until smooth. The icing should be thick but flow slowly from the whisk. If it is too thick, add the remaining tablespoon of milk. If it is too thin, add more powdered sugar, one tablespoon at a time.
- Color the icing: Divide the icing into two portions—about ¾ white and ¼ for black. Add black gel food coloring to the smaller portion until you reach your desired darkness.
- Pipe the base layer: Spoon the white icing into a small piping bag or zip-top bag with a tiny corner snipped off. Pipe a thin outline around the edge of each cooled cookie, then fill in the center with more icing. Use the back of a spoon or a small offset spatula to spread it evenly. Let the base layer set for about 10 minutes.
- Create the spiderweb: Using the black icing, pipe 3-4 concentric circles on top of the white icing. Then, drag a toothpick from the center of the cookie outward through all the circles, like drawing spokes on a wheel. Repeat this 6-8 times around the cookie. Wipe the toothpick clean between each drag.
- Let the icing set: Allow the decorated cookies to sit at room temperature for at least 1 hour, or until the icing is firm to the touch.
Notes
Do not skip chilling the dough; it prevents spreading. Icing consistency is key—aim for honey-like thickness. Work in batches of 3-4 cookies for best web pattern. Use a light hand with the toothpick and clean it often.
Nutrition
- Serving Size: 1 cookie
- Calories: 185
- Sugar: 16
- Sodium: 75
- Fat: 8
- Saturated Fat: 5
- Carbohydrates: 27
- Protein: 2
Keywords: spiderweb cookies, sugar cookies, Halloween cookies, easy decorated cookies, no royal icing, toothpick spiderweb


