Love this? Save it for later!
Share the inspiration with your friends
I told my daughter we were making a black cat cake for Halloween. She looked at me, then at the cookie dough I was scooping onto a pizza pan, and said, “That doesn’t look like a cat, Mom.” She wasn’t wrong. It looked like a giant, lumpy chocolate disk. I figured it would take a few minutes of explaining and maybe some frosting to fix the situation. It took about ten seconds for that plan to fall apart completely.
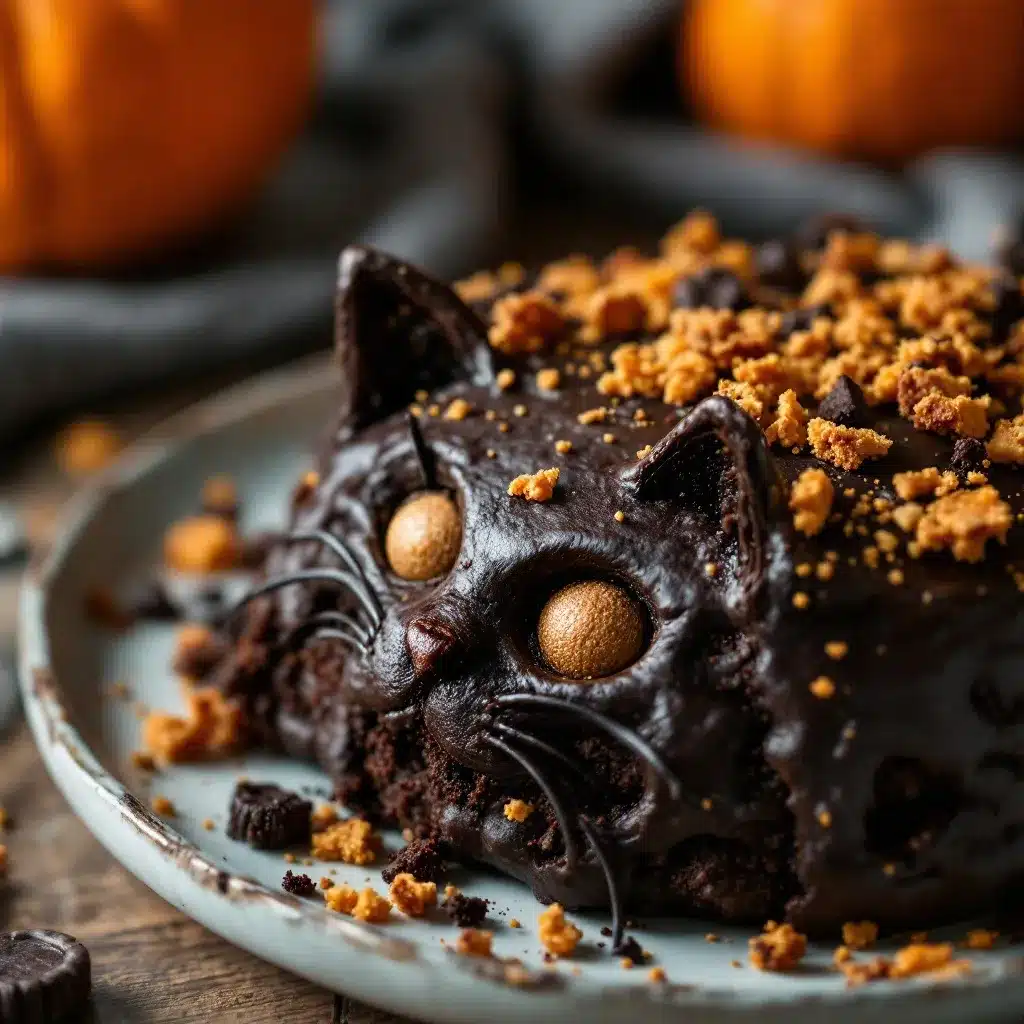
The thing is, I wasn’t trying to fool anyone. I was trying to make something that felt like Halloween—spooky but not scary, sweet but not overly complicated. A cake that looked like a black cat, but tasted like the best chocolate chip cookie you’ve ever had. A cookie cake. It sounded simple enough. But as I stood there, looking at a pan of warm, puffy chocolate dough, I realized I had no idea how to turn it into a cat.
That’s when my husband walked in. He looked at the pan, looked at me, and said, “Just cut it.” So I did. I cut a round shape, pulled off two triangles for ears, and rearranged the scraps. Suddenly, it was a cat. It wasn’t perfect. The ears were a little crooked, and the tail was more of a stub. But it was a cat. And when I piped on some black frosting and added candy eyes, it looked back at me—a little goofy, a little lopsided, and completely, utterly perfect.
That’s the thing about this Spooky Black Cat Halloween Cookie Cake. It doesn’t have to be perfect. It just has to be made. And honestly, the imperfections are what make it feel like Halloween. It’s a recipe that lets you be a little messy, a little creative, and a whole lot satisfied. No fancy tools, no complicated steps—just a giant, shareable cookie that happens to look like a cat. And that, I’ve learned, is the best kind of Halloween treat.
Why You’ll Love This Recipe
I’ve tested a lot of Halloween desserts over the years. Some were too fussy. Others were too dry. This one hits the sweet spot—literally. Here’s why this Spooky Black Cat Halloween Cookie Cake has become my go-to for October 31st.
- Incredibly Easy to Make: You don’t need cookie cutters, piping bags, or any special skills. Just bake a giant cookie and cut out the shape. It’s that simple.
- Perfect for Halloween Parties: This cookie cake is a showstopper. It’s big enough to feed a crowd and looks amazing on any dessert table. It’s the kind of thing that makes people say, “Wait, you made that?”
- Kid-Friendly Fun: Let your little ones help with the decorating. They can place the candy eyes, pipe the frosting, and add their own spooky touches. It’s a great way to get them involved in the kitchen.
- Deep, Rich Chocolate Flavor: This isn’t a bland, cakey cookie. It’s dense, chewy, and packed with cocoa. The black cocoa powder gives it that dark, spooky color without any artificial dye.
- Customizable to Your Taste: Don’t like black cocoa? Use regular cocoa powder. Want a gluten-free version? Swap the flour. This recipe is forgiving and adaptable.
What makes this recipe different from the dozens of other Halloween cookies out there? It’s the texture. This cookie cake is thick, soft in the center, and slightly crisp around the edges. It’s the kind of cookie that you can’t stop eating. And because it’s a single giant cookie, it stays moist and delicious for days. Honestly, it’s the only Halloween dessert I make anymore. It’s comfort food reimagined—spooky, sweet, and completely stress-free.
What Ingredients You Will Need
This recipe uses simple, pantry-friendly ingredients to create a rich, dark chocolate cookie that’s perfect for Halloween. No weird stuff here—just real ingredients that work together beautifully.
- Unsalted butter, softened: (1 cup / 2 sticks / 227g) – Make sure it’s really soft, not melted. Soft butter creams better with the sugar, giving you a lighter cookie. I always use unsalted so I can control the salt level.
- Granulated sugar: (1 cup / 200g) – Adds sweetness and helps create those crispy edges.
- Light brown sugar, packed: (1 cup / 200g) – This gives the cookie its chewy texture and adds a hint of molasses flavor. Don’t skip it.
- Large eggs: (2, room temperature) – Room temperature eggs blend into the batter more smoothly. If you forgot to take them out, place them in a bowl of warm water for 5 minutes.
- Vanilla extract: (2 teaspoons) – Pure vanilla is best, but imitation works fine too.
- All-purpose flour: (2 ½ cups / 312g) – Spoon and level it. Scooping directly from the bag can pack in too much flour and make your cookie dry.
- Black cocoa powder: (½ cup / 50g) – This is the secret to the spooky black color. It’s different from regular cocoa—it’s darker, less acidic, and has a mild Oreo-like flavor. I buy it online or at specialty baking stores. You can substitute regular unsweetened cocoa powder, but the color will be more of a dark brown.
- Baking soda: (1 teaspoon) – Helps the cookie spread and rise slightly.
- Salt: (1 teaspoon) – Balances the sweetness and enhances the chocolate flavor. I use fine sea salt.
- Semi-sweet chocolate chips: (2 cups / 340g) – I like using a mix of regular and mini chips. The minis distribute evenly, while the larger ones give you those gooey pockets of chocolate. A good layer cake needs the right chocolate, and so does this cookie.
For the Black Cat Decoration:
- Black gel food coloring: (a few drops) – Gel is much more concentrated than liquid. A little goes a long way.
- Pre-made vanilla frosting: (1 cup) – Store-bought is fine. It’s already soft and easy to tint.
- Candy eyes: (2 large) – You can find these at craft stores or online. I like the ones with the little pupils.
- Black licorice strings: (for whiskers, optional) – Cut them into small pieces.
Equipment Needed
You don’t need a lot of fancy tools for this Spooky Black Cat Halloween Cookie Cake. Here’s what I use:
- Large baking sheet or pizza pan: (12-inch round or larger) – A pizza pan is perfect because it has low sides, which helps the cookie spread evenly. If you only have a rimmed baking sheet, flip it over and use the underside.
- Parchment paper or silicone baking mat: – Non-negotiable. It prevents sticking and makes cleanup a breeze.
- Electric mixer (hand or stand): – You can cream the butter and sugar by hand, but it takes a while. A mixer makes it much easier.
- Large mixing bowls: – One for the dry ingredients, one for the wet.
- Spatula or wooden spoon: – For folding in the chocolate chips.
- Sharp knife or pizza cutter: – For cutting the cookie into the cat shape while it’s still warm.
- Piping bag or zip-top bag: – For the frosting. A zip-top bag with a tiny corner snipped off works perfectly.
If you don’t have a pizza pan, don’t worry. You can use a 9×13-inch baking sheet and shape the cookie into a rectangle, then cut out the cat shape. It’s not as round, but it still works. I’ve also used the back of a large baking sheet in a pinch. Just make sure it’s clean and lined with parchment.
Preparation Method
Let’s get baking. This recipe moves quickly, so read through everything before you start. Trust me.
- Preheat and Prep: Preheat your oven to 350°F (175°C). Line a large baking sheet or pizza pan with parchment paper. Set it aside.
- Cream the Butter and Sugars: In a large mixing bowl, beat the softened butter, granulated sugar, and brown sugar together on medium speed until light and fluffy. This takes about 3-4 minutes. You want it to look pale and airy. Don’t rush this step—it’s what gives the cookie its tender texture.
- Add the Eggs and Vanilla: Beat in the eggs one at a time, making sure each is fully incorporated before adding the next. Then add the vanilla extract and beat until combined. The mixture might look a little curdled at this point. That’s okay.
- Mix the Dry Ingredients: In a separate bowl, whisk together the flour, black cocoa powder, baking soda, and salt. Whisking aerates the mixture and ensures everything is evenly distributed.
- Combine Wet and Dry: Gradually add the dry ingredients to the wet mixture, mixing on low speed. Add it in three batches, mixing just until the flour disappears. Overmixing at this point will make the cookie tough. Stop when you see no more streaks of flour.
- Fold in the Chocolate Chips: Using a spatula, gently fold in the chocolate chips. Make sure they are evenly distributed throughout the dough. The dough will be thick and slightly sticky.
- Shape the Giant Cookie: Transfer the dough to your prepared baking sheet. Using your hands (lightly greased or dusted with flour), press the dough into a large, even circle about 12 inches in diameter. Aim for uniform thickness—about ½ inch thick. If the dough is too sticky, chill it for 15 minutes first.
- Bake: Bake for 18-22 minutes. The edges should be set and lightly golden, but the center will still look a little soft and puffy. Don’t overbake! The cookie will continue to cook as it cools on the hot pan. For a softer, chewier cookie, pull it out at the 18-minute mark.
- Shape the Cat (Crucial Step): This is the moment. While the cookie is still warm (within 2-3 minutes of coming out of the oven), place a small bowl or plate (about 6-8 inches in diameter) upside down in the center of the cookie. Use a sharp knife to trace around it, cutting out a large circle. Remove the bowl. You now have a round cookie base. Use the scraps to cut out two triangles for ears and a long, thin strip for a tail. Arrange the ears and tail around the circle to form a cat shape. Let the cookie cool completely on the pan.
- Decorate: Once the cookie is completely cool, it’s time to decorate. Tint the vanilla frosting with black gel food coloring until you reach your desired shade. Transfer the frosting to a piping bag or a zip-top bag with a tiny corner snipped off. Pipe a thin line of frosting around the edges of the head, ears, and tail to “glue” them together. Then, fill in the entire surface of the cat with frosting, creating a smooth, black coat. Place the candy eyes on the face. Use the black licorice strings for whiskers, if desired. You can also pipe a small pink nose or a little mouth. Let the frosting set for about 30 minutes before serving.
Cooking Tips & Techniques
I’ve made this cookie cake more times than I can count, and I’ve learned a few things the hard way. Here are my best tips for success.
Don’t Overbake the Cookie. This is the number one mistake. A giant cookie continues to bake on the hot pan after you pull it out of the oven. If you wait until the center looks fully set, you’ll end up with a dry, crunchy cookie. Pull it out when the edges are golden and the center is still soft and puffy. It will look underdone, but it’s not. Trust the process.
Work Quickly When Shaping. The cookie is easiest to cut and shape when it’s still warm. If you wait too long, it will harden and become crumbly. Set a timer for 2 minutes after the cookie comes out of the oven. That’s your window. If it does harden before you’re done, pop it back in the oven for 1-2 minutes to soften it up.
Use a Serrated Knife for Cutting. A sharp serrated knife cuts through the warm cookie more cleanly than a straight blade. It creates less cracking and crumbling. A pizza cutter also works well for the straight lines.
Chill the Dough if Needed. If your kitchen is warm or the dough feels too sticky to handle, pop it in the fridge for 15-20 minutes. Chilled dough is much easier to shape and press into an even circle. I’ve also found that chilling the shaped dough on the pan for 10 minutes before baking helps the cookie hold its shape better and prevents excessive spreading.
Make the Frosting Ahead of Time. Tinting frosting black takes a little patience. Start with a small amount of gel food coloring, mix it in, and then add more if needed. The color will deepen over time. I like to make the frosting a day ahead and let it sit in the fridge overnight. The color develops and becomes a true, deep black.
Variations & Adaptations
This recipe is incredibly versatile. Here are a few ways to make it your own.
- Gluten-Free Version: Substitute the all-purpose flour with a 1:1 gluten-free baking blend. I’ve used Bob’s Red Mill and King Arthur brands with great results. The texture will be slightly more tender, but it’s still delicious.
- White Chocolate Chips: Swap the semi-sweet chips for white chocolate chips. The contrast between the dark cookie and the white chips is striking and perfect for Halloween. It also adds a creamy sweetness.
- Peanut Butter Swirl: Drop spoonfuls of peanut butter on top of the dough before baking and swirl it in with a knife. The salty, nutty flavor pairs beautifully with the dark chocolate. It’s like a peanut butter cup in cookie cake form.
- Spider Web Design: Instead of a black cat, decorate the cookie as a giant spider web. Pipe concentric circles of white frosting onto the black frosting, then drag a toothpick from the center outward to create the web effect. Add a plastic spider for a fun touch.
- Pumpkin Spice Twist: Add 1 teaspoon of pumpkin pie spice to the dry ingredients. The warm spices complement the dark chocolate and give the cookie a cozy fall flavor. It’s a great alternative if you’re not a fan of black cocoa.
One year, I made a batch of these cookies as ghost shapes instead of cats. I just cut the warm cookie into rounded shapes and piped on white frosting. It was a huge hit. The base recipe is so forgiving that you can adapt it to any Halloween theme. Classic peanut butter cookies are great, but this cookie cake is a whole different level of fun.
Serving & Storage Suggestions
This Spooky Black Cat Halloween Cookie Cake is best served at room temperature. The texture is perfect—soft and chewy with slightly crisp edges. I like to cut it into wedges, like a pizza, and serve it on a platter. It’s a shareable dessert that’s perfect for parties.
For a truly decadent treat, serve it warm with a scoop of vanilla ice cream on top. The contrast between the warm cookie and the cold ice cream is heavenly. You can also drizzle it with caramel sauce or sprinkle it with crushed candy corn for extra Halloween flair.
Storage: Store any leftover cookie cake in an airtight container at room temperature for up to 3 days. The cookie will stay soft and chewy. If you’ve already decorated it with frosting, place a sheet of wax paper between the lid and the cookie to prevent the frosting from smudging.
Freezing: You can freeze the undecorated, baked cookie for up to 2 months. Wrap it tightly in plastic wrap, then in aluminum foil. When you’re ready to serve, thaw it at room temperature, reheat it in a 300°F oven for 5 minutes, and then decorate it. The frosting is best applied fresh.
I’ve found that the flavors actually meld and deepen after a day or two. The black cocoa becomes more pronounced, and the cookie becomes even more tender. So don’t be afraid to make it a day ahead. Just keep it unfrosted and decorate it right before serving.
Nutritional Information & Benefits
Let’s be honest—this is a treat. It’s not a health food. But that doesn’t mean you can’t enjoy it mindfully. Here’s a rough estimate of the nutritional content per serving (based on 12 servings).
| Nutrient | Amount per Serving |
|---|---|
| Calories | ~450 |
| Total Fat | 22g |
| Saturated Fat | 13g |
| Carbohydrates | 60g |
| Sugar | 42g |
| Protein | 5g |
| Fiber | 2g |
Black cocoa powder, the star ingredient here, is rich in antioxidants called flavonoids. These compounds can help reduce inflammation and support heart health. Dark chocolate in general has more antioxidants than milk chocolate, so you’re getting a little bit of a nutritional boost.
This recipe contains gluten, dairy, and eggs. It is not suitable for vegans or those with celiac disease without modifications. I’ve included gluten-free and dairy-free options in the variations section above. Always check your ingredient labels if you have specific dietary needs.
I believe in balance. This cookie cake is a celebration. It’s meant to be enjoyed with family and friends on a special occasion. One slice isn’t going to derail your healthy habits. It’s going to make your Halloween a little sweeter. A classic banana pudding is a great everyday dessert, but this is for the spooky season.
Conclusion
This Spooky Black Cat Halloween Cookie Cake has become a tradition in our house. It’s the dessert we look forward to all October long. It’s not just about the taste—it’s about the process. The way my daughter’s face lights up when she sees the cat shape emerge from the warm cookie. The way we all gather around the table to decorate it, each adding our own silly touch. It’s a memory, baked into a giant chocolate chip cookie.
I love this recipe because it’s forgiving. It doesn’t demand perfection. It invites creativity. You can make it as simple or as elaborate as you want. You can follow the instructions exactly, or you can let your imagination run wild. That’s the beauty of it.
So go ahead. Make a mess. Laugh at the lopsided ears. Eat a slice while it’s still warm. And then share a photo with me—I’d love to see your spooky creations. Leave a comment below and tell me how it turned out. Did you add your own twist? Did your kids help with the decorating? I want to hear all about it. Happy Halloween, and happy baking!
Frequently Asked Questions
Can I use regular cocoa powder instead of black cocoa?
Yes, you can substitute regular unsweetened cocoa powder. The color will be a dark brown instead of black, but the taste will still be delicious. You might need to add a little extra food coloring if you want a darker color.
How do I make the cookie less sweet?
You can reduce the granulated sugar to ¾ cup. The cookie will still be sweet, but it won’t be as cloying. You can also use dark chocolate chips instead of semi-sweet, as they have a more bitter flavor.
Can I make this cookie cake ahead of time?
Absolutely. Bake the cookie, let it cool completely, and store it in an airtight container at room temperature for up to 2 days. Decorate it right before serving. You can also freeze the undecorated cookie for up to 2 months.
My cookie spread too much and lost its shape. What went wrong?
This usually happens if the dough was too warm or the butter was too soft. Make sure your butter is softened, not melted. If the dough feels sticky, chill it for 15-20 minutes before baking. Also, make sure you’re pressing the dough into a thick, even circle—not too thin.
Can I use a different shape instead of a cat?
Yes! The same technique works for any simple shape. You can make a ghost, a pumpkin, a bat, or even a spider. Just cut the warm cookie into the desired shape using a knife or a cookie cutter. The possibilities are endless.
Pin This Recipe!

Spooky Black Cat Halloween Cookie Cake – Easy Halloween Dessert

A giant, chewy chocolate chip cookie cake shaped like a black cat, perfect for Halloween. Easy to make and decorate, this spooky treat is a fun and delicious way to celebrate the holiday.
- Prep Time: 20 minutes
- Cook Time: 20 minutes
- Total Time: 40 minutes
- Yield: 12 servings 1x
- Category: Dessert
- Cuisine: American
Ingredients
- 1 cup (2 sticks / 227g) unsalted butter, softened
- 1 cup (200g) granulated sugar
- 1 cup (200g) light brown sugar, packed
- 2 large eggs, room temperature
- 2 teaspoons vanilla extract
- 2 ½ cups (312g) all-purpose flour
- ½ cup (50g) black cocoa powder
- 1 teaspoon baking soda
- 1 teaspoon salt
- 2 cups (340g) semi-sweet chocolate chips
- Black gel food coloring (a few drops)
- 1 cup pre-made vanilla frosting
- 2 large candy eyes
- Black licorice strings (for whiskers, optional)
Instructions
- Preheat your oven to 350°F (175°C). Line a large baking sheet or pizza pan with parchment paper.
- In a large mixing bowl, beat the softened butter, granulated sugar, and brown sugar together on medium speed until light and fluffy, about 3-4 minutes.
- Beat in the eggs one at a time, ensuring each is fully incorporated before adding the next. Add the vanilla extract and beat until combined.
- In a separate bowl, whisk together the flour, black cocoa powder, baking soda, and salt.
- Gradually add the dry ingredients to the wet mixture, mixing on low speed in three batches, just until the flour disappears. Do not overmix.
- Using a spatula, gently fold in the chocolate chips until evenly distributed.
- Transfer the dough to the prepared baking sheet. Using lightly greased or floured hands, press the dough into a large, even circle about 12 inches in diameter and ½ inch thick. If the dough is too sticky, chill for 15 minutes first.
- Bake for 18-22 minutes. The edges should be set and lightly golden, but the center will still look soft and puffy. Do not overbake.
- While the cookie is still warm (within 2-3 minutes of coming out of the oven), place a small bowl or plate (about 6-8 inches in diameter) upside down in the center. Use a sharp knife to trace around it, cutting out a large circle. Remove the bowl. Use the scraps to cut out two triangles for ears and a long, thin strip for a tail. Arrange the ears and tail around the circle to form a cat shape. Let the cookie cool completely on the pan.
- Once the cookie is completely cool, tint the vanilla frosting with black gel food coloring until you reach your desired shade. Transfer the frosting to a piping bag or a zip-top bag with a tiny corner snipped off. Pipe a thin line of frosting around the edges of the head, ears, and tail to ‘glue’ them together. Then, fill in the entire surface of the cat with frosting, creating a smooth, black coat. Place the candy eyes on the face. Use the black licorice strings for whiskers, if desired. Let th…
Notes
Don’t overbake the cookie; it continues to cook on the hot pan. Work quickly when shaping the cat while the cookie is still warm. If the dough is sticky, chill it for 15-20 minutes before shaping. Tinting frosting black takes patience; start with a small amount of gel food coloring and add more as needed. The cookie can be made ahead and stored unfrosted for up to 2 days.
Nutrition
- Serving Size: 1 slice (1/12 of coo
- Calories: 450
- Sugar: 42
- Sodium: 280
- Fat: 22
- Saturated Fat: 13
- Carbohydrates: 60
- Fiber: 2
- Protein: 5
Keywords: Halloween cookie cake, black cat cookie, chocolate chip cookie cake, Halloween dessert, spooky cookie


